Wi-Fi Site Surveys, Analysis, Troubleshooting runs on a MacBook (macOS 11+) or any laptop (Windows 7/8/10/11) with a standard 802.11a/b/g/n/ac/ax wireless network adapter.
How to Change WiFi Channel on Your Router
Using the most suitable WiFi channel is a key to unlocking fast internet speeds, and this article explains how to change the default WiFi channel on your router with the help of NetSpot WiFi channel scanner.
Let’s take a look at how you can use NetSpot, a professional WiFi channel scanner and site survey app for macOS and Windows, to find the best WiFi channel for your particular location so that you can change WiFi channel without guessing.
What Is Wi-Fi Channel?
The 802.11 standard for WiFi networks provides several distinct radio frequency ranges for use in WiFi communications, with the 2.4 GHz, 5 GHz and 6 GHz bands being used most often. All of these frequency bands consist of multiple channels. The 6 GHz band with WiFi 6E significantly broadens the spectrum available for wireless communications.
The 2.4 GHz band has a total of fourteen channels, but not all of them are allowed in all countries. In North America, for example, only 11 of the 14 channels can be used. Each channel in the 2.4 GHz band is 22 MHz wide, and there are 5 MHz gaps between the centers of adjacent channels.
This means that all channels except for the channels 1, 6, and 11 (or 2, 7, 12 or 3, 8, 13 or 4, 9, 14, if allowed) overlap.

The situation is a lot better in the 5 GHz band because there’s much more space. The 5 GHz band offers 23 non-overlapping 20 MHz wide channels, as well as several 40 MHz, 80 MHz, and 160 MHz channels.
With the introduction of the 6 GHz band, WiFi 6E provides an additional 1,200 MHz of spectrum, offering up to 59 new non-overlapping 20 MHz channels, along with support for wider 40 MHz, 80 MHz, and even 160 MHz channels. This reduces congestion and interference, making the 6 GHz band ideal for high-speed, low-latency applications like streaming and gaming.
While WiFi routers have been broadcasting on the 2.4 GHz band since the original version of the 802.11 standard was released in 1997, the 5 GHz band hasn’t seen much in terms of utilization until the release of the 802.11n standard in 2009.
The introduction of WiFi 6E and WiFi 7 standards further leverages the 6 GHz band, offering greater channel width and supporting even higher data rates with advanced modulation techniques like 4096-QAM. These advancements allow networks to handle more simultaneous connections and deliver enhanced performance in crowded environments.
The WiFi standard, 802.11ac, supports both the 2.4 GHz and 5 GHz bands, giving users who know how to change WiFi channel an excellent opportunity to achieve higher speeds and greater coverage. WiFi standard 802.11 ax, or WiFi 6 and WiFi 6E improve upon this by not only enhancing performance in the 2.4 GHz and 5 GHz bands but also unlocking the potential of the 6 GHz spectrum, ensuring seamless connectivity for modern, bandwidth-intensive devices.
Which Wireless Channel to Use
Let's dive into the different Wi-Fi channel placement scenarios you might encounter to optimize your network's performance and avoid interference.
Partially Overlapping Channels
When two or more routers operate on partially overlapping channels, interference reaches its peak. This is the worst-case scenario for your network, as it can drastically reduce speeds and reliability. Avoid these channels whenever possible to minimize disruption.
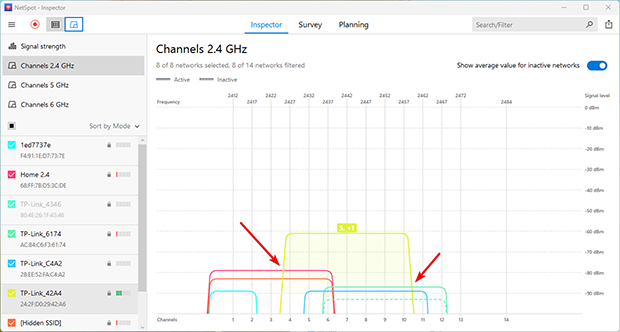
Practical Advice:
- Find a free channel: Use a Wi-Fi analyzer like NetSpot to scan the airwaves and identify the least crowded or entirely free channels.
- Avoid partial overlap: If no free channels are available, it’s better to select a channel with full overlap rather than partial overlap to minimize interference.
- Switch to 5 GHz or 6 GHz: If your equipment supports these frequencies, consider switching to them. They provide more available channels and are less prone to interference.
Full overlap
This happens when multiple networks operate on the same channel. While it’s not ideal, the CSMA/CA (Carrier Sense Multiple Access with Collision Avoidance) technology allows devices to "negotiate." They take turns using the channel, reducing collisions. Although it won't provide perfect speeds, this can be the best option in crowded environments to maintain a stable connection.
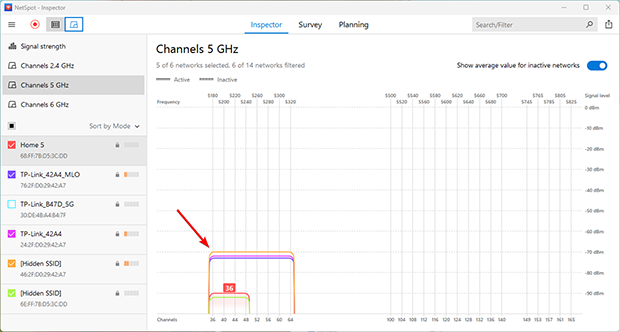
Practical Advice:
- Stay on the current channel: If all channels are occupied and switching isn’t an option, using a fully overlapping channel can be a viable solution.
- Monitor the situation: Regularly check channel usage. If a free or less crowded channel becomes available, switch to it for improved connection quality.
- Optimize router settings: Ensure your router uses the latest technology and firmware for better traffic management.
Non-Overlapping Channels
This is the ideal setup. If your channel doesn’t overlap with others, you’ll enjoy the best possible connection quality. Unfortunately, this scenario is rare. To achieve it, use a Wi-Fi analyzer like NetSpot to identify and choose non-overlapping channels for your router.
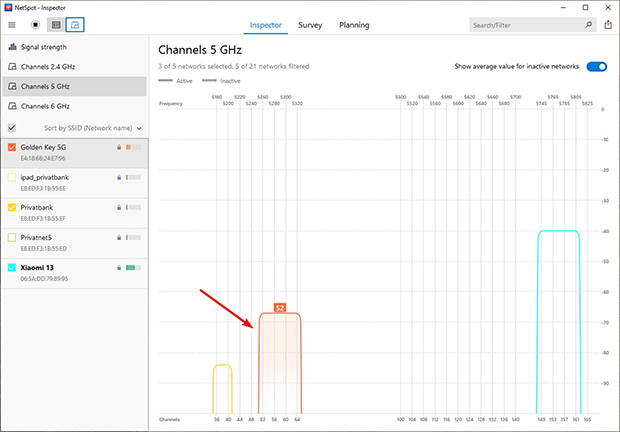
Practical Advice:
- Periodic monitoring: Even if your router is set to a non-overlapping channel, regularly use a Wi-Fi analyzer to check the current airwave conditions.
- Be proactive about changes: Neighboring networks may adjust their settings, causing interference. Responding quickly to such changes will help maintain high connection quality.
- Upgrade your equipment: Using modern devices that support newer Wi-Fi standards can improve stability and speed.
How to Use a WiFi Channel Analyzer and Optimize Your Network for Maximum Speed
NetSpot is a versatile WiFi site survey, WiFi analysis, and troubleshooting tool for macOS and Windows that can also be used as a WiFi channel analyzer to show WiFi channel overlap. Here’s what you need to do to discover the best WiFi channel:
Visit the official website of NetSpot and download the free version of the application. Open the downloaded installation file and follow the instructions.
Launch NetSpot and click Continue to use the free version of the application. NetSpot launches in Inspector mode by default, and that’s a great starting point for changing your WiFi channel. In this mode, a table displays detailed information about your network and surrounding networks, including the channel, channel width, frequency band, and other vital network characteristics. This overview helps you identify the optimal channel to minimize interference.
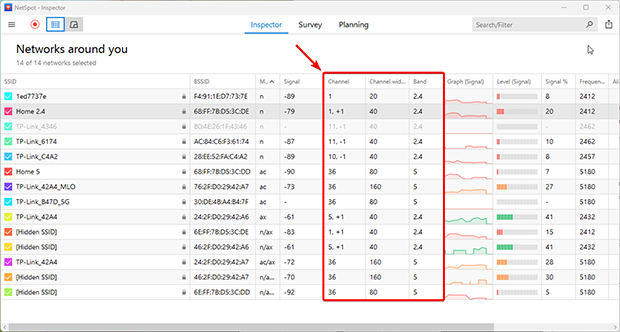
Select your own WiFi network and click “Signal level and noise graphs” button.
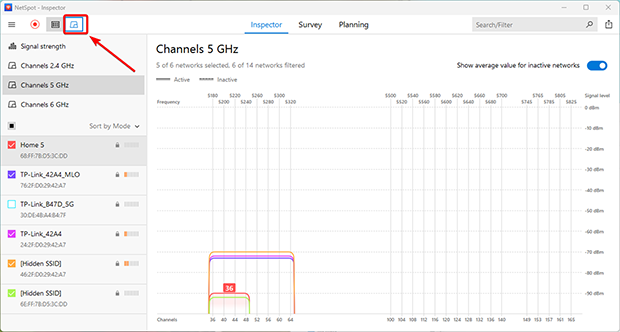
Now, switch to the Channels 2.4 GHz tab and look at the channel graph displayed by NetSpot to see which channel your WiFi network broadcasts on and which channels it overlaps with. Remember this information.
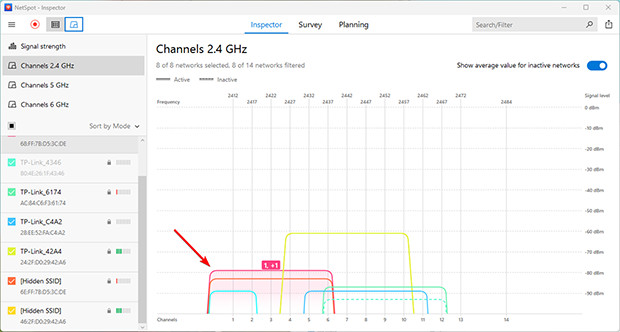
Analyze the position of your network in relation to surrounding networks. Deselect your network in the table and select all others. The channel graph will immediately show which channels are most congested and which ones are available. Use this information while following the recommendations from the previous points.
Now that you know which channels are used the least, the only thing left to do is to actually change your router channel setting, and we describe how to do just that in the next section of this article.
As you can see, NetSpot is incredibly easy to use, which is why many consider it to be the best WiFi channel scanner for Mac and the best WiFi channel scanner for Windows. With its help, avoiding co-channel interference by doing methodical WiFi channel planning prior, during, and post deployment is something anyone can do.
Besides helping you understand WiFi channel overlap, you can also use NetSpot to create a comprehensive WiFi coverage heat map with Survey mode. By outlining your real-life WiFi data on a map, you can easily discover all areas of signal weakness and decide if it wouldn’t be better to place your router elsewhere. All the information you gather with NetSpot can be exported in PDF or CSV and used in other applications.
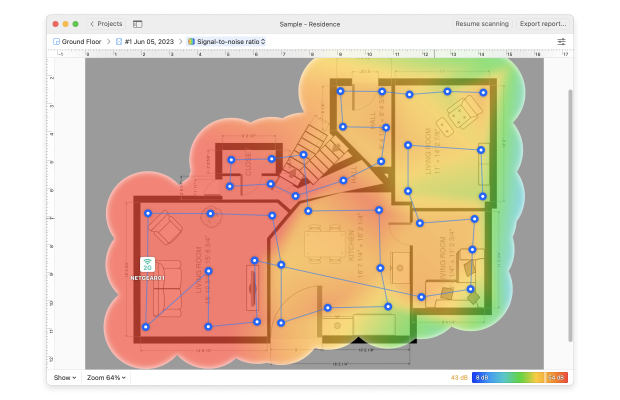
What’s great about NetSpot is that you can download it for free and run it on any macOS or Windows computer with a standard 802.11a/b/g/n/ac/ax wireless network adapter. NetSpot supports 2.4 GHz, 5 GHz and 6 GHz frequency bands at 20/40/80/160 MHz channels, making it fully compatible with the latest WiFi standard.
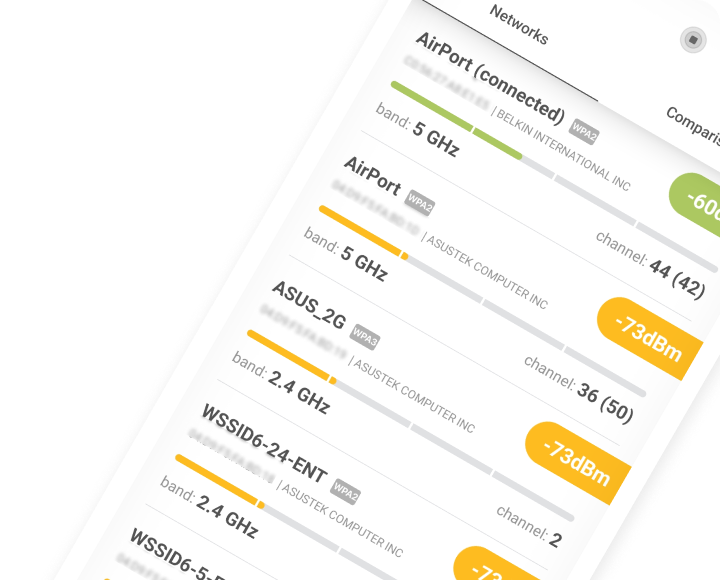
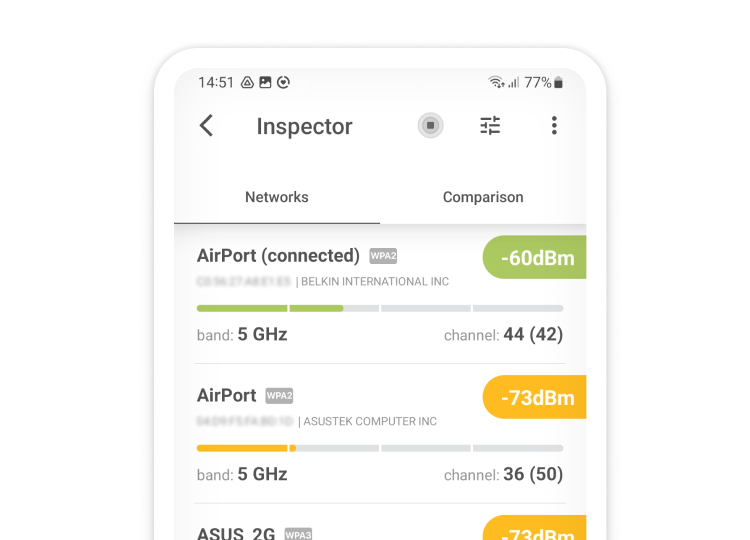
In fact, NetSpot is also one of the best WiFi channel scanners for Android, so make sure to explore the mobile versions of NetSpot as well if you find the idea of using your smartphone to change channels on router interesting.

Analyze WiFi networks around you, perform wireless surveys, and test Internet speed - all with just a phone or tablet in your hands.
How to Change Your Wi-Fi Channel to Improve Signal: Step-by-Step Guide
Even the most basic routers allow you to change WiFi channel. Here’s a step-by-step guide that explains how to change your WiFi channel so that you can eliminate issues with signal interference and enjoy the best download and upload speed possible:
Log in to your router’s admin interface. If you don’t know what your router’s IP address is, open a Command Prompt in Windows and type “ipconfig” without the quotes. Look for “Default Gateway” and copy & paste the address next to it into your browser’s URL bar.
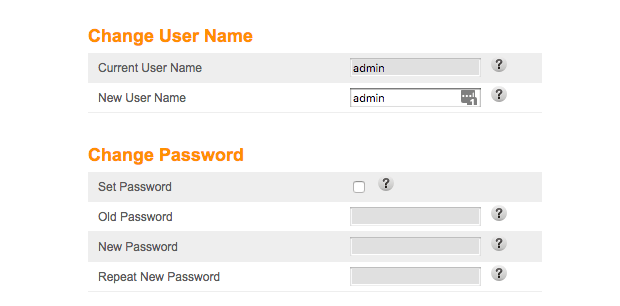
You should now see your router’s admin interface and a login prompt, and you need to enter the admin username and password. Unless you’ve changed the default administrator credentials to something more secure (which is always a good idea), “admin” should work both as the password and as the username. If it doesn’t, look for a sticker on your router or contact your internet service provider to help you.

Next, tell your router to use the channel you’ve picked earlier. Each router is slightly different, but most routers hide the option to change WiFi channel somewhere in the advanced settings menu. If you can’t find it there, we recommend you open your router’s manual and see if it mentions how to do it.
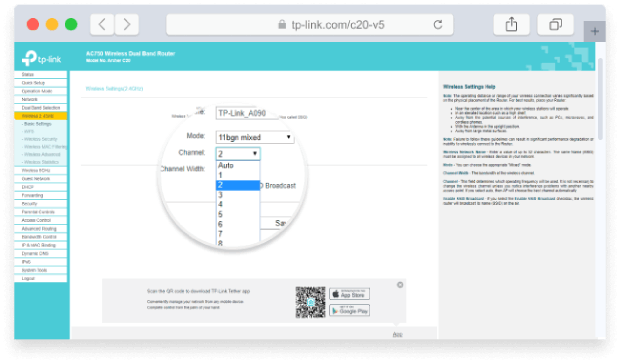
Save the new WiFi channel settings and restart your router if asked to do so. You shouldn’t have to reconnect devices that are already connected to your WiFi network unless you’ve decided to change the network’s name or password as well.
After you’ve changed the channel and restarted your router, launch NetSpot one and verify that your router is really broadcasting on the best channel.
Conclusion
Many WiFi issues are caused by the use of a wrong WiFi channel. When multiple networks broadcast on overlapping channels, interference may occur and make what would otherwise be a stable and reliable network unusable. This interference can lead to slow internet speeds, frequent disconnects, and a frustrating online experience.
To prevent this from happening,it's crucial to select the optimal WiFi channel for your network environment. Use a WiFi channel analyzer such as NetSpot to identify the best WiFi channel in your area. NetSpot not only helps you find the least crowded channel but also provides insights into signal strength and potential sources of interference, allowing you to fine-tune your network for maximum performance.
NetSpot can also help you decide whether the time has come to replace your current router with a newer model, one that supports the latest WiFi standard. Upgrading to a modern router can offer enhanced features like dual-band or tri-band support, access to the less congested 5 GHz or 6 GHz frequencies, and improved security protocols — all contributing to a faster and more reliable WiFi connection.
FAQ
To change WiFi channel on your router, you need to log in to the router’s admin interface and go to wireless settings. Since most routers protect the admin interface with a password, you should attempt to find out what the password is before you start guessing.
If your router has a companion smartphone app, you can use it instead of accessing the admin interface directly via your web browser. Once you’re in the wireless settings section, look for an option called WiFi channel or WiFi band. To achieve optimal performance, use only channels 1, 6, and 11.
There’s no such thing as the best WiFi channel since all non-overlapping channels in the 2.4 GHz band (channels 1, 6, and 11) are capable of delivering the same performance and coverage under ideal circumstances.
The problem is that real-world circumstances are typically far from ideal, and some channels are used far more frequently than others. As such, the best channel for your WiFi router is typically the one that’s used the least, and you can find out which channel that is using a WiFi network analyzer app.
