• #1 NetSpot
  • Wi-Fi Site Surveys, Analysis, Troubleshooting
  • 4.8
  • 969 User reviews

How to Set Up WiFi

The idea of accessing the internet only from a computer that’s physically connected to a modem is outdated. These days, internet access should be omnipresent.
top choice
  • NetSpot
  • Wi-Fi Site Surveys, Analysis, Troubleshooting
  • 4.8
  • 969 User reviews
In this article, we’ll teach you how to set up WiFi at home so you can say goodbye to cables and enjoy online content from anywhere.

What Do I Need to Set Up WiFi?

To set up WiFi at home, you need an internet connection. Telephone companies typically provide Digital Subscriber Line (DSL) connections, while cable companies provide cable internet connections, both of which are broadband internet connections and should offer speeds that are high enough to support all modern use cases.

Regardless of who you choose as your ISP (Internet Service Provider), you should end up with an internet modem connected to a jack in a wall and acting as the receiver for your internet signal. Some ISPs provide their customers with internet modems that double as wireless routers, in which case you’re all set and can skip to the next section of this article.

But if your internet modem is unable to set up WiFi, you’ll also need to purchase and connect a dedicated wireless router.

How to Setup WiFi Router

There are many different types of wireless routers, from inexpensive home routers designed for casual use to feature-packed gaming routers with multiple antennas and state-of-the-art technologies. The good news is that the WiFi setup process is virtually always the same.

1. Unplug your internet modem from power.
2. Connect your wireless router to your internet modem using an Ethernet cable.
Connect the router with your modem
3. Plug in the power cable for both the internet modem and the wireless router.
4. Wait for the light on the front of your wireless router to indicate that it has established an internet connection. This can take several minutes.

5. Proceed to the next chapter of this article to learn how to configure your wireless router.

How to Configure WiFi Router

With your wireless router connected to the internet, open a web browser and enter your router’s default IP address into the address bar, then press Enter. We recommend you consult the manual to find out what the address is, but you can also try some of the most common addresses, including 192.168.0.1, 192.168.1.1, and 192.168.2.1.

Log in to your routers admin panel

Your router’s sign in page should appear. Again, consult your router’s instructions to find out what the default login name and password are. After you log in, your router’s settings page will appear, allowing you to change the name (also known as SSID) of your WiFi network and configure various security settings.

Enter your new WiFi name

It’s paramount that you use the latest form of wireless encryption, WPA2, to prevent strangers from stealing your personal information. Many older wireless routers only support WEP encryption, which has been deprecated by the IEEE (Institute of Electrical and Electronics Engineers) and is no longer considered safe. If your wireless router is among them, replace it with a newer model.

Where Should I Place My WiFi Router?

Now that you’ve learned how to set up WiFi at home, it’s time to learn about wireless router placement. As a rule of thumb, do your best to place your wireless router as close to the center of your home as possible to evenly cover the entire place with WiFi signal.

Select a Good Place for Your Router

It’s also important to place your wireless router away from large obstacles such as walls or heavy furniture. Various electronic devices, including your microwave and home entertainment system, may cause electronic interference and decrease the performance of your wireless router as well.

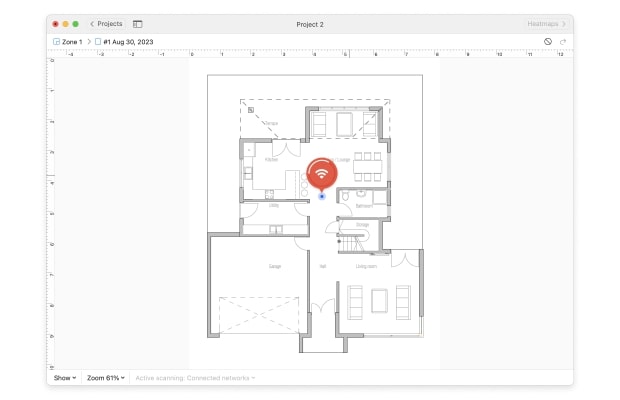
NetSpot, a professional app for wireless site surveys, WiFi analysis, and troubleshooting on macOS and Windows, allows you to evaluate the potential space for your WiFi network thanks to its WiFi Network Planning feature.

  1. Start a new project in NetSpot and place your wireless router close to the center of your home.
  2. Take a few samples, and then move it to the next location to take new data points.
  3. Once you have measured the entire space, you can merge all snapshots by clicking the Plus (+) icon at the right end of the bar.

WiFi Network Planning

Using the information provided by NetSpot, choose a place that seems most suitable for your wireless router and move on to the next chapter of this article.

How Can I Check My WiFi Coverage?

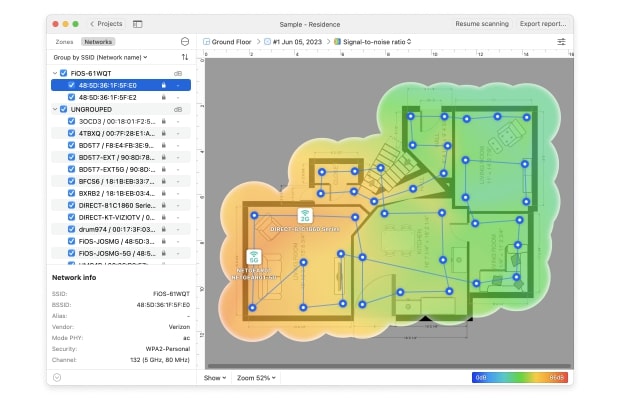
Just like you can use NetSpot to determine the optimal place for your wireless router, you can also use it later to check your WiFi coverage.

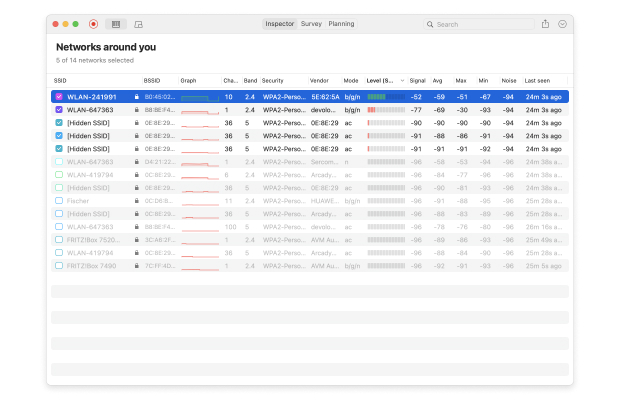
1. Launch NetSpot and Inspector on the top-left of the NetSpot window and wait a few seconds for the data to start coming in.
2. A list of wireless networks will appear,and your WiFi should be on it.
Inspector Mode NetSpot

3. One parameter displayed by NetSpot is called Level, and it tells you the signal-to-noise ratio of your WiFi network, with higher numbers being better.


  • A ratio of 10-15dB is the accepted minimum to establish an unreliable connection.
  • 16-24dBis usually considered poor.
  • 25-40dB is good.
  • And a ratio of 41dB or higher is considered excellent.
Signal-to-noise ratio

If your signal-to-noise ratio is poor, there are a few things you can do to improve it. You can switch to a different WiFi channel to minimize interference caused by other WiFi networks in your area. You can switch from the 2.4 GHz band to the 5 GHz band, if your router supports it. And you can also purchase a WiFi extender.

How to Setup WiFi Extender

A WiFi extender is a relatively inexpensive device that takes your router’s existing WiFi signal, boosts it, and rebroadcasts it to fill in all the unconnected nooks and crannies in your home.

1. Using the information provided by NetSpot, locate where your signal is the weakest and install your WiFi extender halfway between the area of signal weakness and your wireless router.
2. Connect the WiFi extender to your existing WiFi network.

3. Connect your electronic devices to the new WiFi network created by your extender.

SO, WE RECOMMEND
NetSpot
Wi-Fi Site Surveys, Analysis, Troubleshooting runs on a MacBook (macOS 11+) or any laptop (Windows 7/8/10/11) with a standard 802.11a/b/g/n/ac/ax wireless network adapter.
  • 4.8
  • 969 User reviews
  • #1
  • Wi-Fi Site Surveys, Analysis, Troubleshooting

  • 500K
  • Users
  • 10
  • Years
  • Cross-platform
  • Mac/Windows

Conclusion

With a professional app for wireless site surveys, WiFi analysis, and troubleshooting on macOS and Windows such as NetSpot, setting up a WiFi network is effortless. NetSpot can help you optimize your WiFi for best performance to ensure that you can enjoy fast internet access from all your devices regardless of where you are. Visit NetSpot’s official website and download it for free right now.

Have more questions?
Submit a request or write a couple words.

Read next in All about Wi-Fi

If you want to dive deeper into this Wi-Fi thing, check out the following articles about Wi-Fi security, the best apps for wireless networking, inflight WiFi, etc.
Get NetSpot for Free
Wi-Fi Site Surveys, Analysis, Troubleshooting runs on a MacBook (macOS 11+) or any laptop (Windows 7/8/10/11) with a standard 802.11a/b/g/n/ac/ax wireless network adapter.
NetSpot
Free WiFi Analyzer
NetSpot for iOS
Heat Maps & Speed Test