Wi-Fi Site Surveys, Analysis, Troubleshooting runs on a MacBook (macOS 11+) or any laptop (Windows 7/8/10/11) with a standard 802.11a/b/g/n/ac/ax wireless network adapter.
What is Signal-to-Noise Ratio and How to Measure it
Even with a robust WiFi setup, traffic can be slow — the problem might not be the router. Learn how boosting your SNR (Signal-to-Noise Ratio) can dramatically improve speed and reliability.
We’ll help you understand what SNR means, and make your signal to noise ratio better to ensure steady traffic, smooth movie streaming, and quick downloads.
Jump to...
How SNR Affects Your Wi-Fi and How to Improve It
One of the most frustrating issues with WiFi connectivity is when everything seems set up correctly — the router is configured, and the network should work seamlessly. Yet, you step into the next room, and the signal quality drops significantly. Upgrading to a high-end router or even switching to an advanced mesh network might not solve the problem.
Users in areas like conference rooms often struggle with connectivity despite strong signal bars, highlighting that the issue goes beyond just signal strength. The issue might not be with the signal strength or network range. Instead, it could be due to a less obvious factor: Signal-to-Noise Ratio. Also known simply as SNR, this metric plays a crucial role in determining your network's performance.
Though it might sound like just another tech acronym (yes, pronounced like "snore"), SNR is vital for WiFi optimization and ensuring stable, high-speed connections. If your network seems fine but downloads are slow or you’re experiencing random disconnects in certain areas of your building, checking the SNR could be the key to uncovering what’s causing the issue. It’s definitely worth your time
What does Signal-to-Noise Ratio Mean
Of course, the first thing when asking about how to fix “signal to noise ratio” issues is to delve into just what SNR means. Signal to Noise is a measurement of how much relevant WiFi signal there is compared to any other signals that can get in the way, impacting network performance and signal clarity. It quantifies the relationship between the desired signal and background noise, both of which influence connection quality.
Usually, when dealing with WiFi issues, there are two main problems:
- Dead spots: Places where our signal can’t reach. This can be because of distance to the WiFi router, the materials the building is made out of, and other related issues. With a dead spot, we just aren’t getting any signal at all. Dead spots result from physical obstructions or inadequate router placement, leading to complete signal loss.
- Signal to Noise ratio: With SNR, the WiFi radio signals may be reaching just fine, but there are other radio signals that make it hard to pick out. This background interference reduces signal clarity and affects Wi-Fi optimization. Devices like microwaves, cordless phones, or neighboring Wi-Fi networks often contribute to this interference.
A Simple Analogy:
Think of each problem like a big room. If I’m on one side, and you’re on the other and you try to talk to me, if your voice is too soft I won’t be able to hear you unless you shout louder. That’s an issue with dead zones or signal strength.
SNR is where we are in the same room, but the room is full of other people. As you try to talk to me, we have to compete with all of the noises other people are making. It doesn’t help if someone else has a voice similar to yours, so I have to figure out when it’s you talking versus someone else.
This illustrates how interference affects signal clarity. In technical terms, this reflects overlapping frequency channels, where competing signals degrade connection stability.
Understanding How SNR is Measured
Despite its name, Signal to Noise ratio isn’t expressed as a typical ratio like “there is 75% signal to 25% noise”. Instead of dividing the signal by the noise, it’s calculated by subtracting the noise level from the signal strength.
Signal Strength (dBm) is measured in negative numbers. The closer the value is to zero, the better the signal strength. For example, -20 dBm is a much stronger signal than -50 dBm.
Noise Level (dBm) is also measured in negative numbers. Here, the goal is the opposite: the closer the number is to -100 dBm, the better, because that means there’s less background noise interfering with your Wi-Fi.
It can be confusing because, in Wi-Fi, decibels are measured in negative values. Think back to grade school math — negative numbers are less than zero. But here’s the twist: in Wi-Fi signals, -15 dBm is actually stronger than -50 dBm. It might seem backward at first, but once you remember that a higher (less negative) number means a stronger signal, it starts to make sense.
Adding to the potential confusion is that signal strength and noise level are measured in decibels-milliwatts (dBm), while Signal-to-Noise Ratio (SNR) is measured in decibels (dB). But in this case, decibels measure the power of the wireless signal, not how loud something is.
Key Formula:
SNR (dB) = Signal Strength (dBm) - Noise Level (dBm)
This simple calculation shows why both strong signals and low noise levels matter. The higher the SNR, the cleaner and more reliable your connection. In advanced fields like radio astronomy or satellite communications, SNR optimization can involve reducing internal noise with specialized equipment, even cooling systems to cut down thermal noise. For home Wi-Fi, it’s much simpler — just focus on minimizing interference for better performance.
Let’s take a look at two different rooms:
- Room A: The average signal strength is -20 dBm, and the noise is around -60 dBm. To get the Signal-to-Noise Ratio (SNR), it’s the signal minus the noise, which means we have an average SNR of 40 dB. This indicates a strong, interference-free connection.

Example 1: Strong SNR
- Room B: The signal is also -20 dBm, but the noise is -25 dBm. Now our SNR is much lower — around 5 dB. Such a low SNR results in slow speeds, high latency, and frequent connection drops.

Example 2: Weak SNR
Notice how difficult it is to tell the difference between the signal and noise lines on this chart compared to the first one? That’s the rule: the lower the signal to noise ratio, the worse communication will be. We want a nice, big number for our SNR or S/N ratio since that means there’s a lot of distance between our signal and our noise.
What is a Good Signal-to-Noise Ratio?
Before getting into specific SNR values, it's crucial to understand why this metric is essential for maintaining a strong and stable network connection. A low SNR can cause:
- Reduced Speeds: Frequent data packet loss lileads to constant retransmissions.
- Unstable Connections: Higher latency and unexpected disconnections become more common.
- Poor Streaming Quality: Buffering issues during video calls or HD streaming.
SNR also impacts other technologies such as mobile networks, VoIP, and video conferencing platforms, where clear, uninterrupted communication relies heavily on maintaining a high SNR.
Now that we've covered why SNR is critical, let's take a closer look at the specific SNR values and how they influence your network performance based on the data below.
| SNR (dB) | Signal Quality | Performance |
| 40 + | Excellent | High-speed, stable connections perfect for any demanding tasks. Ideal for 4K streaming, online gaming, and professional-grade applications. |
| 25 - 40 | Very Good | This is where you can do video conferences, stream high-speed videos, and download large files like gigabyte sized .iso files or movies. Connections are stable with minimal packet loss. |
| 15 - 25 | Fair | This is average and competent for web browsing and file downloading. Just don’t expect to be watching 1080p videos off Netflix and Youtube at a good rate.Suitable for standard usage but not ideal for bandwidth-intensive tasks. |
| 10 - 15 | Barely functional | Really slow, but at least there’s a signal. If all you’re doing is getting basic emails, then you can get by. Streaming, video calls, or large downloads will struggle in this range. |
| Less than 10 | Unusable | Connectivity is unreliable, and data loss is common. The noise is so high that it's indistinguishable from the signal, causing frequent disconnections. Stop what you’re doing and fix the problems. The noise is so high that it's indistinguishable from the signal. |
- *For enterprise-grade networks, a target SNR of 35 dB or higher is recommended to support high-density environments.
Of course, this will be determined by your basic signal strength. If your bandwidth strength is only -5 dB and your noise is 0, then your Signal to Noise is great but your signal strength is still trash. So first make sure the signal is strong, then focus on the signal to noise ratio.
How to Measure SNR Effectively
One of the most useful tools that work as a signal to noise calculator comes from NetSpot.
- Open the app and select Inspector Mode.
- Scan Networks and identify the Wi-Fi network in question.
- Check the “Signal” and “Noise” values.
- The signal-to-noise ratio is already calculated in the “SNR” column; you need to include it in the displayed columns. Alternatively, you can calculate it yourself by subtracting the noise level from the signal level.
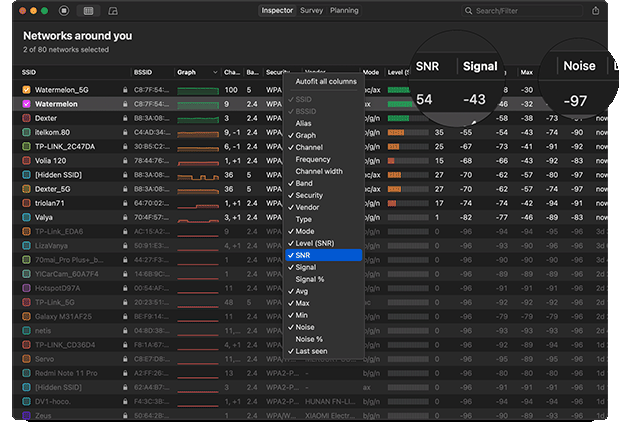
Let's take a look at an example based on a typical Wi-Fi signal measurement screenshot.
Example: If your signal strength is -43 dBm and noise is -97 dBm:
SNR = -43 - (-97) = 54 dB (Excellent)
Additionally, NetSpot can also visually represent SNR through heatmaps, allowing you to quickly identify areas with poor signal quality and potential interference sources.

How to Improve Your Signal-to-Noise Ratio
Improving SNR involves either boosting the signal strength or reducing the noise level:
First, get a WiFi signal analyzer. We’ve already mentioned NetSpot, and that’s a great place to start. It shows a list of all of the networks it identifies.

Once you see the list of WiFi signals, you can do a few things to increase the SNR ratio:
- Remove Extra WiFi networks. This is especially true if this is a business environment. There are few reasons for someone to be running a separate WiFi network, whether it be from their cell phone and tethering or otherwise. With NetSpot, you can get an idea where its at as you trace it’s signal strength.
- Check for “Noisy” devices. Take a look at the devices around the WiFi router. Is it next to a television, refrigerator, or other electronic devices? Try moving it away a bit. There was once a place with awful WiFi coverage until someone discovered that the WiFi router was next to the company’s fire alarm bell. Once it was moved away, the signal noise dropped.
- Turn off unneeded signals. Some routers support multiple bands in the 2.4 GHz and 5 GHz range. Try turning off the 2.4 GHz signal if it’s not needed — it’s overcrowded compared to its 5 GHz sibling.
- Use High-Gain Antennas. High-gain antennas can concentrate the Wi-Fi signal in specific directions, enhancing the range and signal strength. This is especially useful in large spaces where standard router antennas might not cover distant areas effectively.
- Bandwidth Management. Quality of Service (QoS) settings allow you to prioritize traffic for critical devices or applications, like video calls or gaming. This helps maintain a stable connection and minimizes the impact of network congestion on SNR.
- Shielding Solutions. In environments with excessive electronic interference (e.g., industrial areas or dense office spaces), electromagnetic shielding can reduce noise. This involves using materials that block or limit external interference, protecting your Wi-Fi signal for improved performance.
Improving your signal-to-noise ratio is key to a fast, stable Wi-Fi connection. By analyzing your network with tools like NetSpot, optimizing your router setup, and minimizing interference, you can achieve excellent SNR levels. Remember, regular monitoring helps keep your network in top shape as your environment changes.
Conclusion
These are just a few ideas, and there are more things to try on the Troubleshooting high noise level. But before you do anything, install Netspot. It has an excellent free version, and users who pay for the full version can get access to other amazing features like heat maps. Download and try it out to help resolve your signal to noise issues so you can use the fast Internet access you need.
SO, WE RECOMMEND

NetSpot
Signal-to-Noise Ratio — FAQs
What is a good Signal-to-Noise Ratio for Wi-Fi?
A good SNR for general web browsing is around 20 dB. For smooth video streaming and VoIP calls, aim for at least 25 dB. An SNR above 40 dB is considered excellent, offering stable connections with minimal interference.
How do I measure my Wi-Fi’s Signal-to-Noise Ratio on Mac?
You can measure SNR on macOS using Wi-Fi analysis tools like NetSpot. Simply launch the Mac version of NetSpot, switch to Inspector Mode, and include SNR in the list. Pay attention to the visual representation in the Level (SNR) column.
Why is my Wi-Fi slow even with a strong signal?
A strong signal doesn’t always mean a fast connection. When your SNR suffers because of interference from devices like microwaves, cordless phones, or nearby WiFi networks, you’re likely to encounter reduced speeds and an unstable connection.
How can I improve my Signal-to-Noise Ratio?
You can boost SNR by reducing interference (moving your router away from noisy devices), optimizing router placement, switching to less crowded channels, or upgrading to high-gain antennas. Tools like NetSpot help identify problem areas quickly.
Get NetSpot for Free
Wi-Fi Site Surveys, Analysis, Troubleshooting runs on a MacBook (macOS 11+) or any laptop (Windows 7/8/10/11) with a standard 802.11a/b/g/n/ac/ax wireless network adapter.