Wi-Fi Site Surveys, Analysis, Troubleshooting runs on a MacBook (macOS 11+) or any laptop (Windows 7/8/10/11) with a standard 802.11a/b/g/n/ac/ax wireless network adapter.
How to Check WiFi Signal Strength on Windows 10 and Windows 11
Before you unload your anger on your internet service provider, check your WiFi signal strength first to determine whether your performance issues are not caused by your router.
There are not many things more frustrating than using a computer with a weak WiFi signal. When websites take ages to load and online video and audio streaming is interrupted every few seconds, then anger and frustration are quick to set in.
The good news is that measuring WiFi signal strength is easy, and you definitely don’t need to be an expert or own specialized equipment. All you need to do is pick one of the methods described in this article and follow our detailed step-by-step instructions.
- How to Check Wi-Fi Signal Strength Using the Taskbar Icon (Windows 10 & 11)?
- How to Check Wi-Fi Signal Strength Using Settings?
- How to Check Wi-Fi Signal Using Control Panel?
- How to Check Wi-Fi Signal Using Command Prompt?
- How to Check Wi-Fi Signal Using PowerShell?
- How to Check Wi-Fi Signal Using NetSpot?
- What to Do if the Signal is Weak?
- Conclusion
- FAQ
How to Check Wi-Fi Signal Strength Using the Taskbar Icon (Windows 10 & 11)?
The quickest way to check WiFi signal strength on Windows 10 and Windows 11 is to open the action center and look at the WiFi status icon. Here’s what you need to do:
On Windows 10
Click the action center icon located right on the taskbar.
Click the WiFi icon at the bottom.
Count the number of bars.
On Windows 11
Click the “Quick Settings” area (the combined icons for network, volume, and battery), then expand the available Wi-Fi networks.
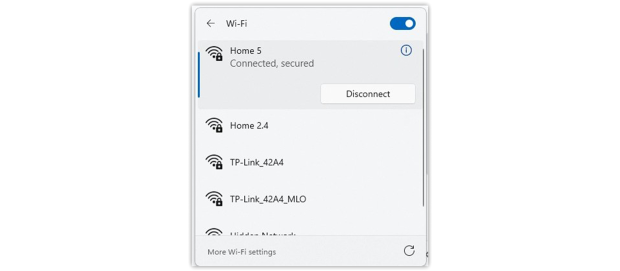
Make sure you are connected to the correct Wi-Fi network. The number of bars indicates your signal strength:
- Four bars: excellent signal.
- Three bars: good signal, usually stable.
- Two bars: fair signal, potential speed drops.
- One bar or a single dot: very weak signal, possible disconnections.
How to Check Wi-Fi Signal Strength Using Settings?
Windows 10 (and newer versions like Windows 11) comes with a new settings menu where you can control all aspects of your operating system and, among other things, check your Wi-Fi signal strength. Here’s how:
Open “Settings”.
- Windows 10: Click Start→ Settings (gear icon).
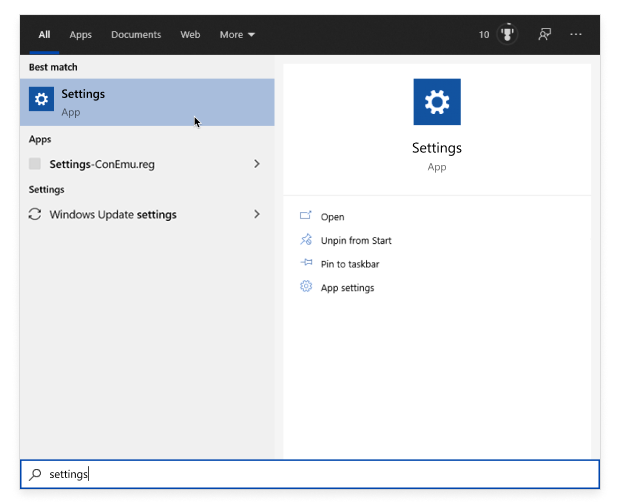
- Windows 11: Click Start → Settings (in an English OS) or the localized equivalent.
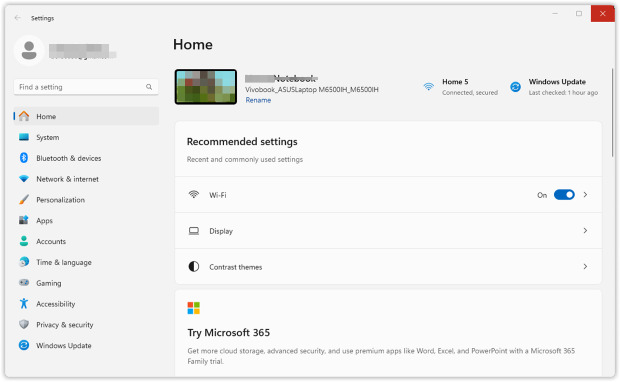
Launch the Settings app and go to Network & Internet.
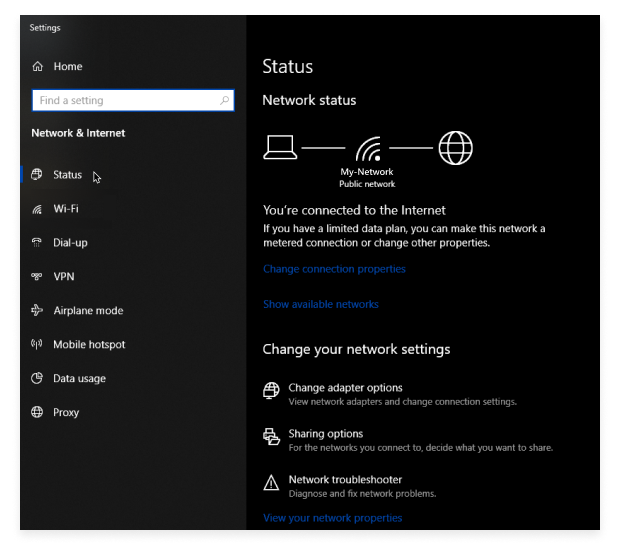
Click “Wi-Fi.”
In Windows 10, you’ll see a left-hand menuIn the left pane, select Status and count the number of bars to determine the approximate strength of your signal.
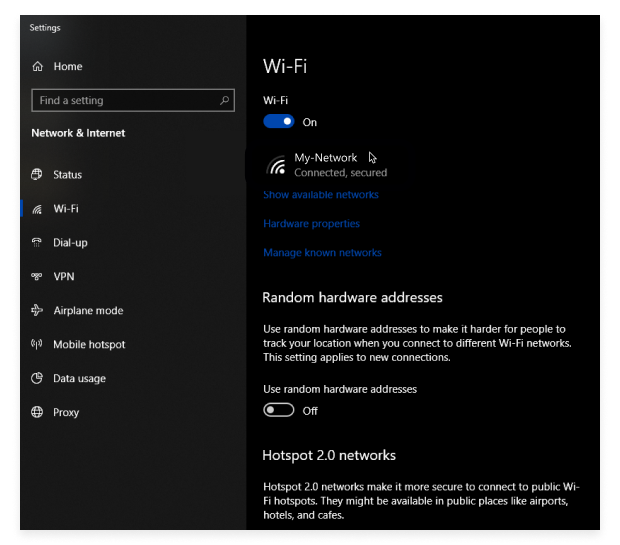
In Windows 11, it may look a bit different but follow the same principle to find the Wi-Fi settings.
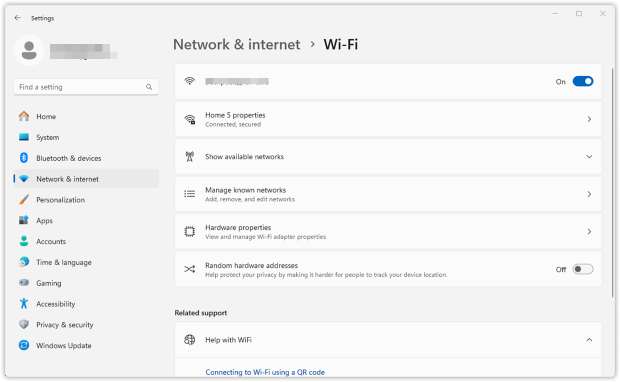
Locate your network name. The Wi-Fi icon next to it shows how many bars are filled, indicating signal strength.
Alternatively, you can also go to the Wi-Fi section, where you can also access your Wi-Fi adapter’s hardware properties and other useful settings.
How to Check Wi-Fi Signal Using Control Panel?
This method is for those Windows users who prefer to use the traditional Control Panel instead of the new Settings app. Because the WiFi signal strength meter in the Control Panel is very basic, don’t expect to see detailed information about your WiFi.
Works for both Windows 10 and Windows 11.
Even though Windows 11 features a revamped Settings interface, the Control Panel remains available and works similarly to how it does on Windows 10.
Open the Start menu and type “control panel”.
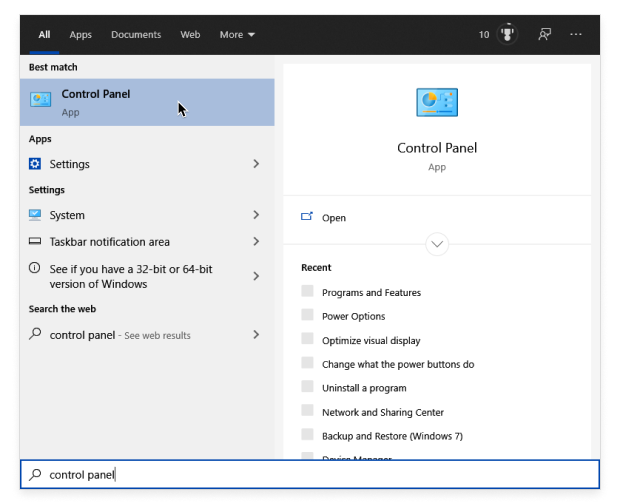
Launch the Control Panel app and go to Network and Internet.
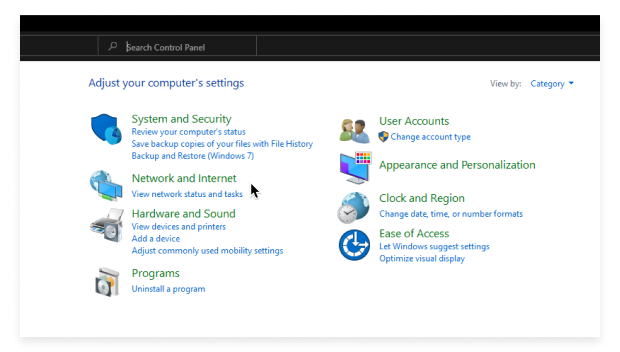
Select View network status and tasks.
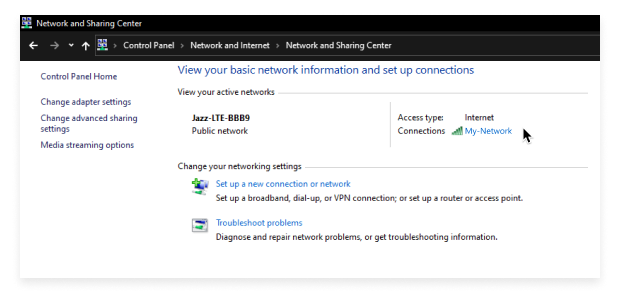
Click the name of your WiFi network to see its signal quality, speed, and other information.
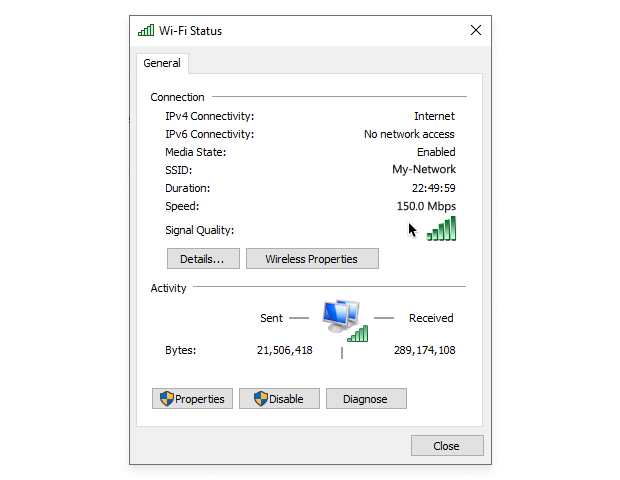
From the Network and Sharing Center, you can also troubleshoot network problems or set up a new connection.
How to Check Wi-Fi Signal Using Command Prompt?
Believe it or not, but you can check the status of your WiFi network using the might Command Prompt, a command line interpreter application available in Windows 10 and Windows 11. Learning how to check WiFi signal strength using Command Prompt is surprisingly simple since the whole process involves just one command:
Open the Start menu and type “command prompt”.
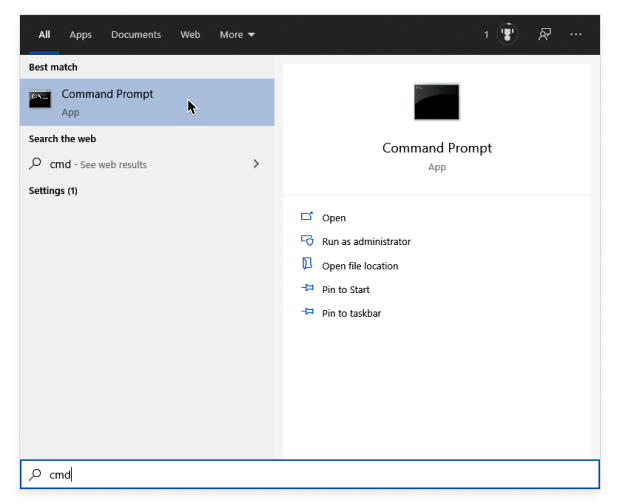
Hit the Win + R shortcut, enter cmd, and then press Enter.

Run the Netsh Command. After launching Command Prompt, type the following command and hit Enter : netsh wlan show interfaces.
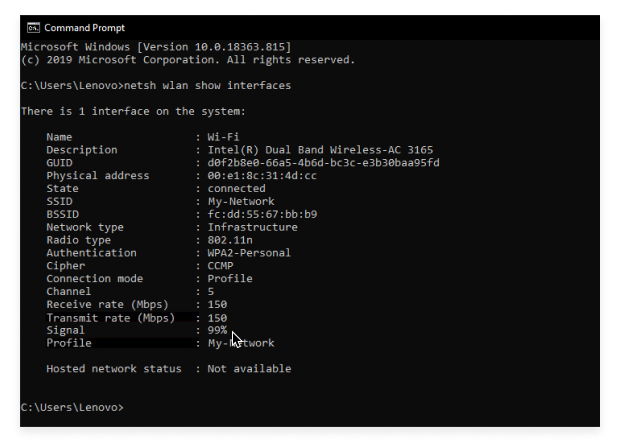
Check the “Signal” Value. Look for the line labeled Signal. You will see a percentage value.
- 75% is fairly good.
- Values of 80–100% are considered excellent.
By reviewing the Signal percentage, you can quickly gauge the strength of your Wi-Fi connection and decide if you need to move your router, update drivers, or take other steps to improve the signal.
How to Check Wi-Fi Signal Using PowerShell?
You can think of PowerShell as a supercharged version of the Command Prompt. It consists of a command-line shell and a powerful scripting language, enabling sophisticated task automation and configuration management. But don’t worry: checking WiFi signal using PowerShell doesn’t require any scripting.
Press Windows + X and select Windows PowerShell.
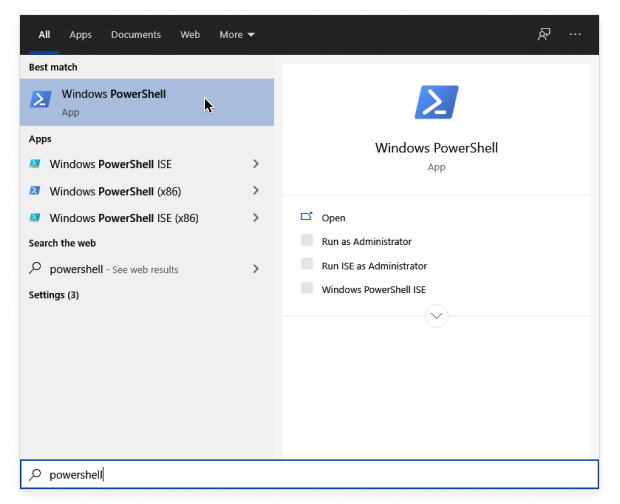
For Windows 11
Use the keyboard shortcut Win + R, enter powershell, and press Enter to launch the PowerShell window.
(On Windows 11, you can also open Windows Terminal and choose PowerShell.)
Then, execute one of the following commands:
netsh wlan show interfaces | Select-String ‘^\s+Signal’
or
(netsh wlan show interfaces) -Match ‘^\s+Signal’ -Replace ‘^\s+Signal\s+:\s+’,”

Your signal strength will be displayed near the bottom. Ideally, you want it to be between 80 and 100 percent. Anything less than that and tasks such as web browsing or video chatting are guaranteed to become less than satisfying.
How to Check Wi-Fi Signal Using NetSpot?
All the above-described methods on how to check WiFi signal strength provide only very basic information. That may be fine if all you need is to quickly determine if a weak WiFi signal is the source of your connectivity issues, but real troubleshooting requires a different approach: a comprehensive WiFi signal strength app like NetSpot.
Besides being our go-to Windows WiFi signal strength meter, NetSpot is also one of the best apps to measure WiFi signal strength on Mac, making it incredibly easy to visualize, manage, troubleshoot, audit, plan, and deploy your wireless networks.
There are two ways to check WiFi signal using NetSpot: you can collect every detail about surrounding WiFi networks using Inspector Mode, or you can outline your real-life WiFi data on a map using Survey Mode.
How to check WiFi signal using NetSpot’s Inspector Mode
Launch NetSpot and switch to Inspector Mode.
Wait a short while for the Wifi signal strength app to gather information about surrounding WiFi networks.
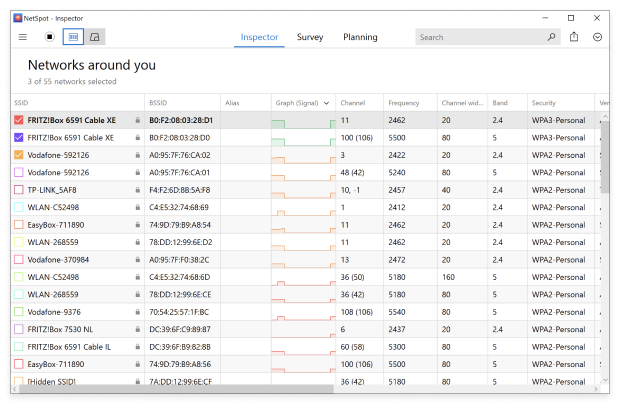
Double-click the network you’re interested in to see real-time information about its signal strength, channel overlap, and more.
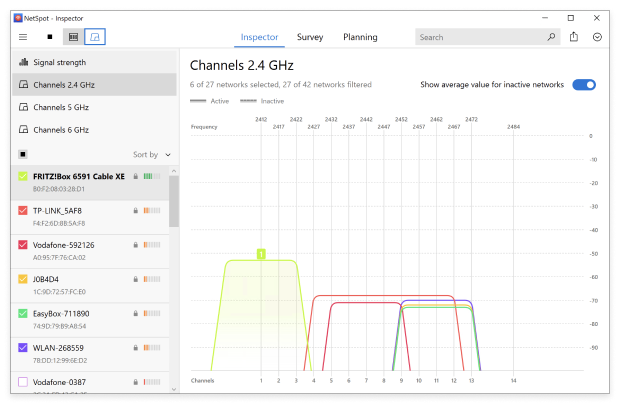
NetSpot’s Inspector Mode is perfect for quickly and easily obtaining a comprehensive view of all wireless activity in your local area, which is essential when troubleshooting issues with WiFi signal interference and other problems.
How to check Wi-Fi signal using NetSpot’s Survey Mode
Launch NetSpot and switch to Survey Mode.
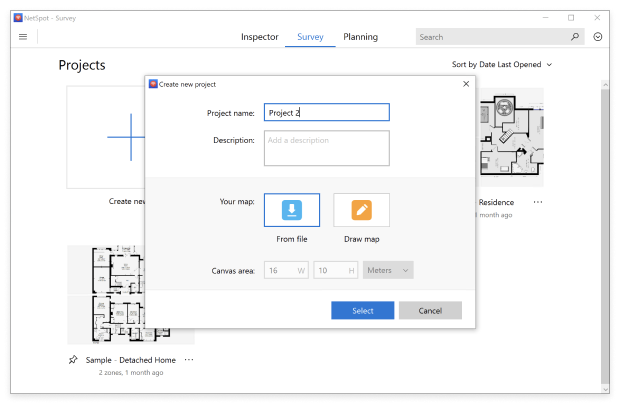
Click the Create new… survey button.
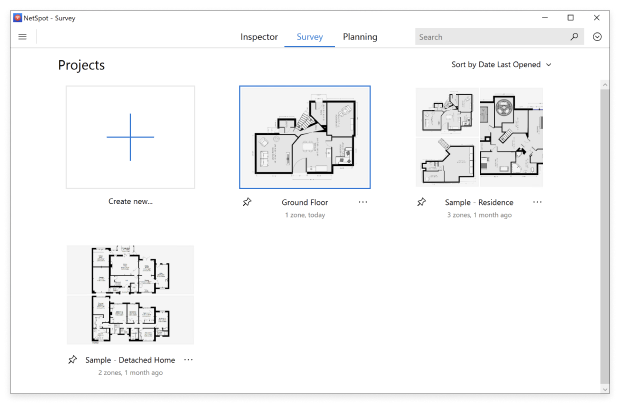
Name your project and either load a map of the area you want to survey from a file or create one from scratch.
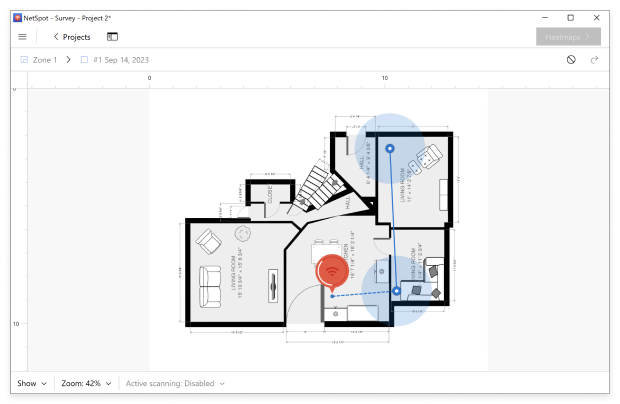
Click on two points on the map, and then input the actual distance between them in the box at the bottom of the window.
Walk to one corner of your space and click the point on the map that corresponds to where you are standing.
Continue moving and scanning until you have covered the whole area of the map that you wish to scan.
When done, stop the scan. NetSpot will visualize signal strength across the entire area.
Use the heatmap to identify low-signal zones and optimize router or repeater placement.
This method is particularly helpful for large homes or offices where Wi-Fi coverage must be maximized.
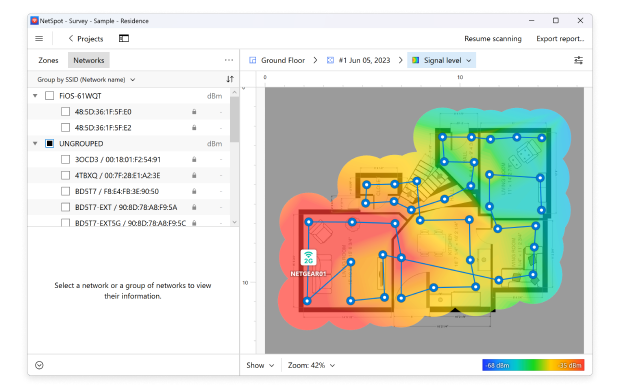
NetSpot offers more than 20 heatmap visualizations to help troubleshoot just about any WiFi-related problem. The app can, for example, visualize signal-to-noise ratio, signal level, noise level, frequency band coverage, wireless transmit rate, and more.
You can download NetSpot for free from its official website and purchase a Home, Pro, or Enterprise license only when you’ve spent enough time evaluating the app to know that it can meet your needs and requirements. Organizations can purchase a discounted company-wide license, and there’s also an Android version of NetSpot that comes in handy whenever you don’t have access to a laptop.
What to Do if the Signal is Weak?
If your signal is around 50–60% (or even lower), try these steps:
- Move your router closer to your primary workstation. Walls, metal, and other electronics can weaken signals.
- Update the Wi-Fi adapter driver on your PC and the router’s firmware. Newer versions can resolve stability issues.
- Switch to a 5 GHz band if your router and device support it; it often suffers less interference but has a shorter range.
- Use a Wi-Fi extender or Mesh system if you have a large space or many obstructions.
- Check for interference from microwaves, Bluetooth gadgets, cordless phones, etc., especially on the 2.4 GHz band.
- Perform a full survey using NetSpot’s Survey Mode to visually pinpoint dead zones and reposition your router accordingly.
Conclusion
Measuring your Wi-Fi signal in Windows 10 and Windows 11 is straightforward, whether you use built-in tools like the Taskbar, Settings, or more advanced methods such as NetSpot. If your signal is too weak, try moving the router, updating drivers, or boosting coverage with a repeater or Mesh.
Remember: strong Wi-Fi equals stable internet, higher speeds, and smoother overall productivity. By diagnosing and addressing weak spots, you can enjoy a seamless connection at home or in the office.
FAQ
Yes, most built-in tools (Taskbar, Settings, Control Panel) do not require admin privileges. However, certain PowerShell or CMD commands might need to run as administrator depending on your system setup.
Different devices use different Wi-Fi adapters and may display signal levels differently. Phones might show more bars due to more optimized hardware or lower sensitivity thresholds.
Upgrading alone does not boost the physical range of your wireless signal, but Windows 11 may provide better driver compatibility and performance optimizations.
The process is the same. Just ensure your desktop has a working Wi-Fi adapter (internal or USB) to detect wireless networks.
