Wi-Fi Site Surveys, Analysis, Troubleshooting runs on a MacBook (macOS 11+) or any laptop (Windows 7/8/10/11) with a standard 802.11a/b/g/n/ac/ax wireless network adapter.
How to Boost Your Wi-Fi Signal: 6 Proven Solutions
Discover how to boost your signal for lightning-fast internet and seamless connectivity throughout your home!
Struggling with slow Wi-Fi, constant buffering, or dead zones in your home or office? Let’s fix that. With just a few adjustments — like optimizing your router’s placement, choosing the best Wi-Fi channel, and leveraging tools like NetSpot — you can drastically improve your signal.
- 1. Protect Your Wi-Fi Network from Unauthorized Access
- 2. Restart Your Router
- 3. Update Firmware and Drivers to Improve Wi-Fi Performance
- 4. Selecting the Best Wi-Fi Channel for Maximum Signal Quality
- 5. Optimizing Router Placement for Best Wi-Fi Coverage
- 6. Expand Coverage and Upgrade Your Equipment
- Conclusion
Here’s a practical guide to solving common Wi-Fi problems, from simple tweaks to advanced fixes. Let’s start with the basics and work our way up.
Setting up network security is a simple yet crucial step for every Wi-Fi user. An unsecured network can slow down your internet and even put your personal data at risk.

Securing your Wi-Fi means creating a strong password, using the latest encryption, and regularly checking connected devices.
Tips:
- Create a strong password: Use at least 12 characters with a mix of letters, numbers, and special symbols to make it harder to crack.
- Use modern encryption: Set your router to WPA2 or WPA3 for the best protection against unauthorized access.
- Set up a guest network: Create a separate network for visitors to keep your main devices and data safe.
2. Restart Your Router
Restarting your router is a quick and effective way to restore network stability. Over time, routers can slow down due to errors or overheating. A reboot clears the device’s memory, fixes temporary glitches, and helps it perform at its best again.

3. Update Firmware and Drivers to Improve Wi-Fi Performance
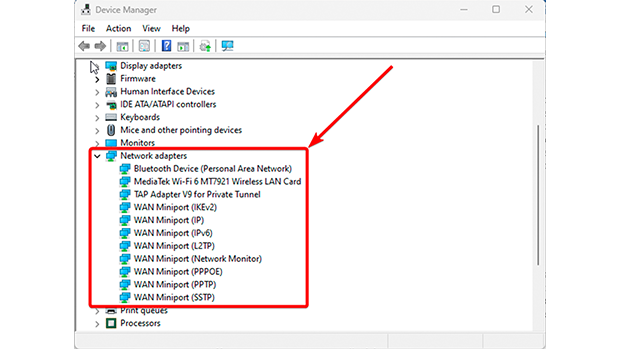
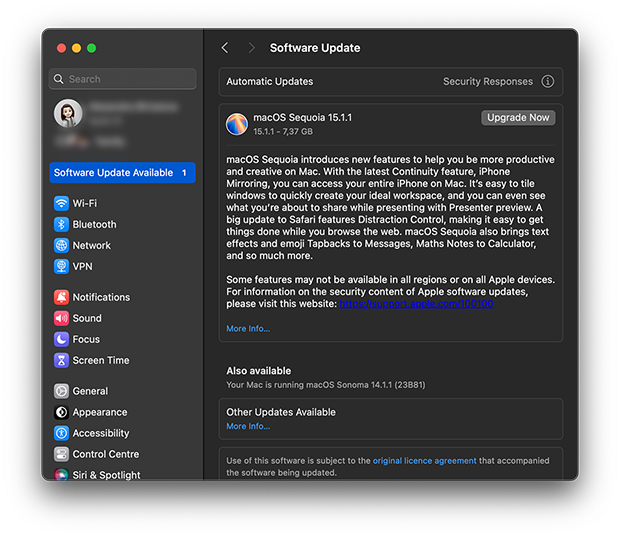
If restarting your router doesn’t improve performance, the next step is updating its firmware. Outdated firmware can have bugs or vulnerabilities that impact speed and connection stability.
Updates not only fix issues and close security gaps but also optimize performance and may add new features like parental controls, guest networks, and advanced QoS settings to better manage traffic and enhance usability.
Updating Router Firmware
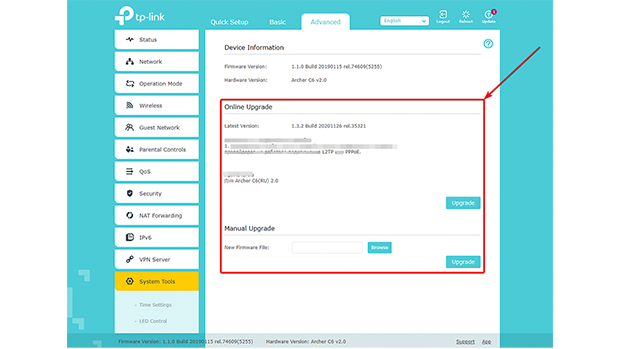
Updating your router’s firmware may vary depending on the manufacturer. First, find your router's model and version, usually printed on a label on the device or in the documentation. For a stable connection during the update, use an Ethernet cable.
Then enter the router's IP address 192.168.X.X in a web browser, where X should be replaced by numbers that may depend on the specific model (usually 192.168.0.1 or 192.168.1.1), log in to the admin panel using the administrator login and password specified in the instructions or on the device. In the firmware update section, which may be called "Update", "Firmware Update" or "System Upgrade", check if a new version is available.
Tips:
- Check compatibility: Always ensure the firmware and drivers you download match your device model.
- Backup your settings: Before updating your router’s firmware, save your current settings to avoid having to reconfigure your network from scratch.
- Don’t power off during updates: Interrupting the update can corrupt the firmware and render your device unusable.
4. Selecting the Best Wi-Fi Channel for Maximum Signal Quality
In densely populated areas with many neighboring Wi-Fi networks, channel congestion is one of the main culprits behind slow speeds and unstable connections.
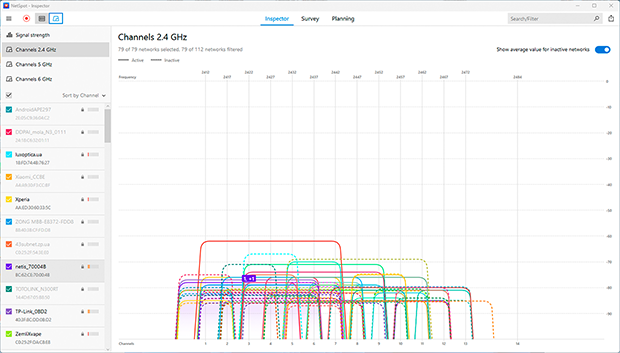
Most users stick to their router’s default settings, leaving their networks operating on the same channels, which leads to heavy interference. Optimizing your Wi-Fi channel can significantly reduce this interference and improve signal quality. Switching to a less crowded channel or band minimizes disruptions and boosts connection stability.
How to choose the best Wi-Fi channel
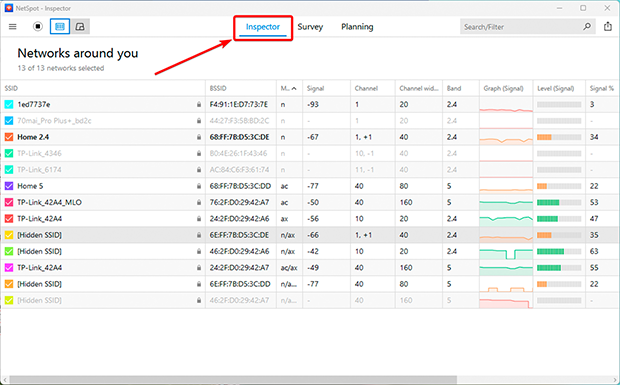
- Open Inspector Mode in NetSpot to identify less congested channels.
- Select the best channel.
-
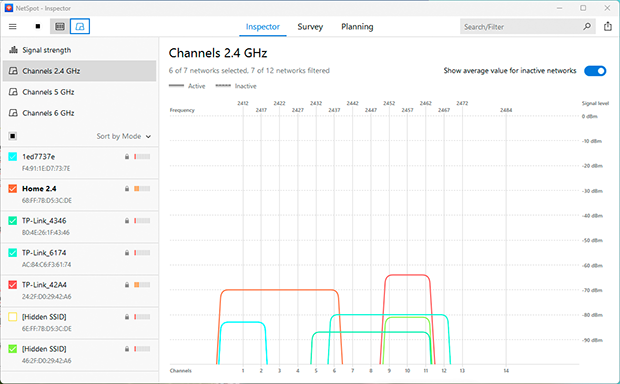
- For the 2.4 GHz band, non-overlapping channels like 1, 6, or 11 are preferable for minimizing interference, but it’s important to choose a channel that is the least congested. If this isn’t possible, choose a fully overlapping channel since devices can “negotiate” and reduce conflicts. Access your router’s settings via the web interface (usually at 192.168.0.1 or 192.168.1.1), locate the wireless settings section, select the less congested channel, and save the changes.
-
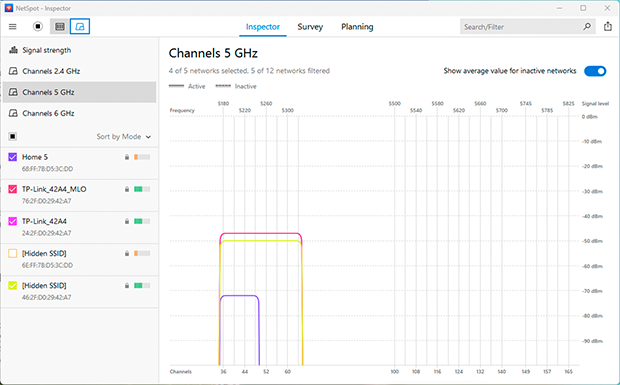
- If your router supports the 5 GHz or 6 GHz bands, switch to one of them. These bands offer higher speeds, experience less congestion, and are less prone to interference from household devices. However, keep in mind that 5 GHz and 6 GHz signals don’t penetrate walls as well and may not be compatible with older devices.
Tips:
- Regularly check channel congestion, as the situation can change over time.
- Combine the 2.4 GHz, 5 GHz, and 6 GHz bands: use 5 GHz or 6 GHz for high-speed devices close to the router, and 2.4 GHz for devices farther away.
5. Optimizing Router Placement for Best Wi-Fi Coverage
If the previous steps haven’t made a big difference, try improving your Wi-Fi coverage by moving your router. People often place their routers where it’s most convenient — on the floor, in a corner, or near other devices — but this can seriously affect network performance.
Various obstacles, such as thick walls (especially concrete or metal-reinforced ones), metal furniture, electronic devices (like microwaves and cordless phones), and even aquariums, can weaken the signal and create "dead zones."
How to use NetSpot to identify weak zones and find the best spot for your router
- Create a Wi-Fi heatmap
-
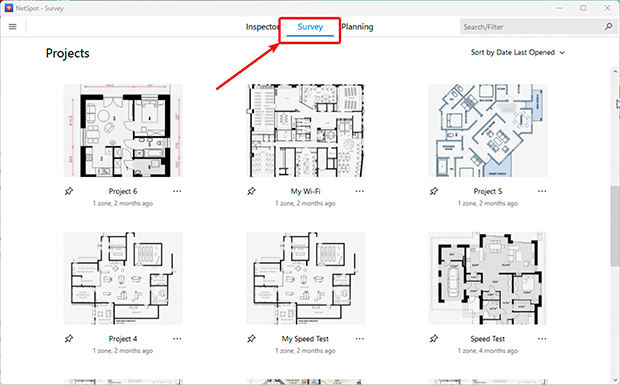
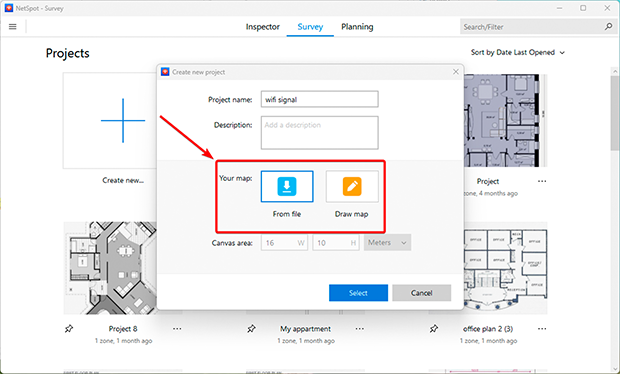
- Launch Survey Mode in NetSpot: Open the app and select the “Survey” mode.
-
- Upload your floor plan: Add a file with your home or office layout, or draw it directly in NetSpot.
-
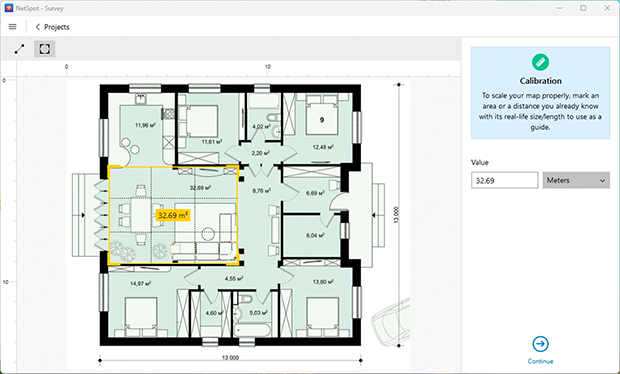
- Calibrate the plan: Use the “Line” or “Area” tools to adjust the dimensions accurately.
-
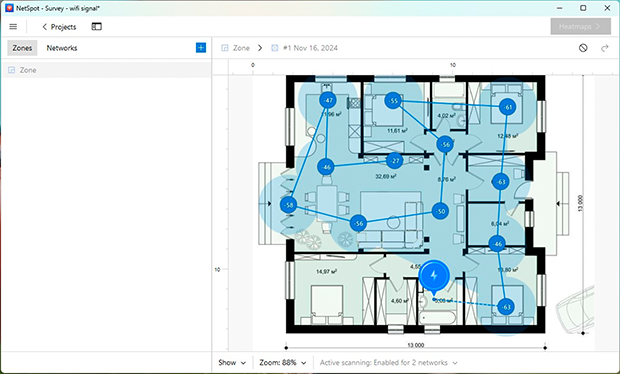
- Scan your space: Choose active scanning mode for more detailed results. Walk through all the areas you want to scan, allowing NetSpot to collect data on signal strength and speed.
-
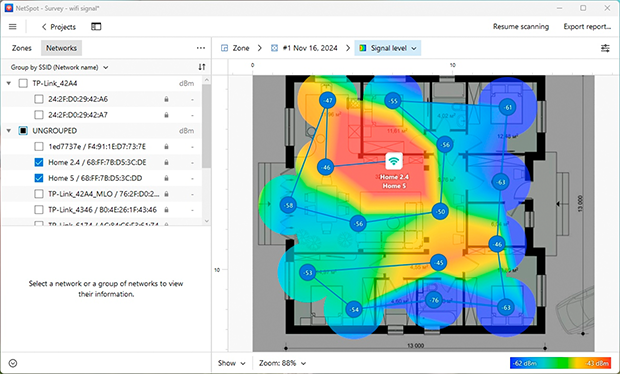
- Analyze the heatmap: Once the scan is complete, NetSpot will generate a heatmap showing areas with strong and weak signals. This will help you pinpoint problem zones and decide where to improve coverage.
- Move your router
- Based on the heatmap results, relocate your router or access point to a more optimal spot.
- Avoid placing it near thick walls, large metal objects, or electronic appliances like microwaves and cordless phones.
- Position the router in an open area, centrally located in the room, and elevated, such as on a shelf or mounted on a wall.
- Check the changes
- After moving the router, run another analysis in NetSpot to confirm that Wi-Fi coverage has improved and weak zones have been reduced.

Tips:
- Adjust the router’s antennas: Change the angles and orientation of the antennas to optimize Wi-Fi coverage in your space.
- Ensure proper ventilation: Make sure the router’s vents are clear of obstructions to avoid overheating, which can degrade performance.
- Expand your network: If coverage issues persist, use Wi-Fi extenders or a Mesh system to eliminate dead zones and ensure seamless connectivity.
6. Expand Coverage and Upgrade Your Equipment
If your Wi-Fi signal remains unreliable despite changing channels and relocating your router, it might be time to consider more advanced solutions. This is especially true for larger homes, offices, or spaces with complex layouts where traditional methods fall short. Tackling these challenges often requires additional devices or upgrading your equipment.
To eliminate weak zones and ensure stable signals, consider using Wi-Fi extenders, Mesh systems, Powerline adapters, or additional access points. NetSpot's Planning Mode is a powerful tool to help you design and optimize your network. It allows you to create a precise network plan, determine the best placement for access points, and choose equipment that fits your needs. One key benefit is the ability to simulate device performance before purchasing, helping you avoid unnecessary expenses.
Steps to Improve Wi-Fi Coverage
- Launch Planning Mode in NetSpot: Open the app and select “Planning Mode.”
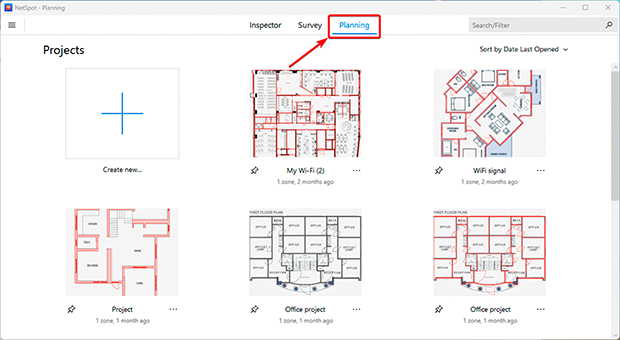
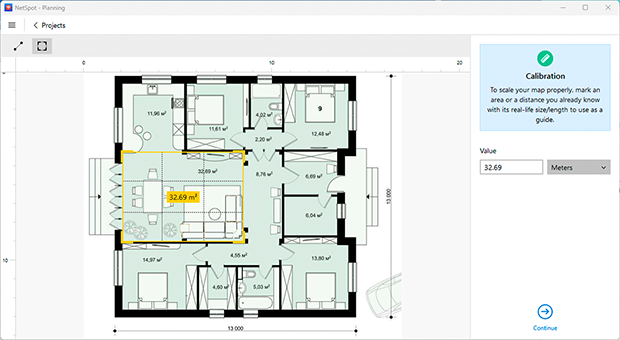
- Upload and calibrate your map: Add an existing floor plan or create one using the built-in tools. Calibrate the dimensions to ensure accurate coverage calculations.
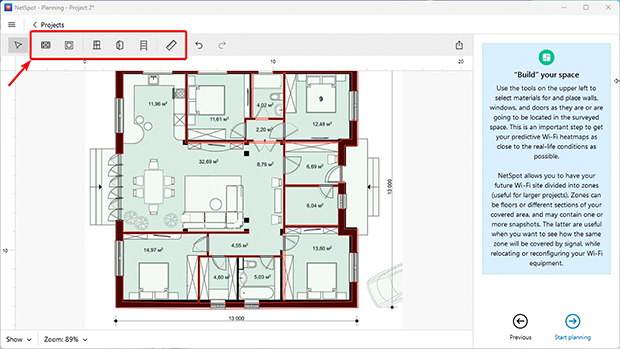
- Draw layout elements: Outline key interior features like walls, doors, and windows. Specify material types (e.g., concrete, metal partitions), as these impact signal propagation.
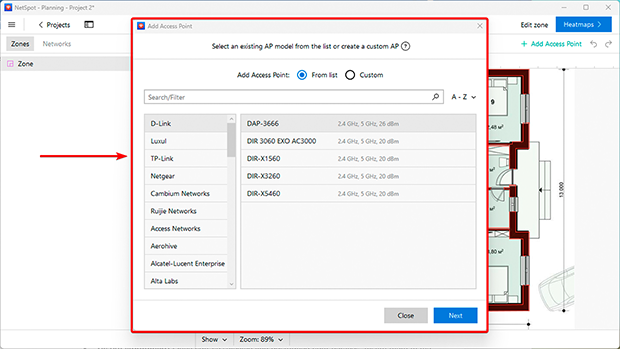
- Choose equipment: Place access points in potential locations. Select models from NetSpot’s list of available routers and access points, allowing you to simulate their performance in your space. If your device isn’t listed, you can manually add it by specifying characteristics like signal power and frequency bands.
- Analyze results: NetSpot will generate Wi-Fi heatmaps, highlighting areas with strong, weak, or no signal. Use this data to adjust device placement for maximum efficiency. You can also test multiple scenarios before installing.
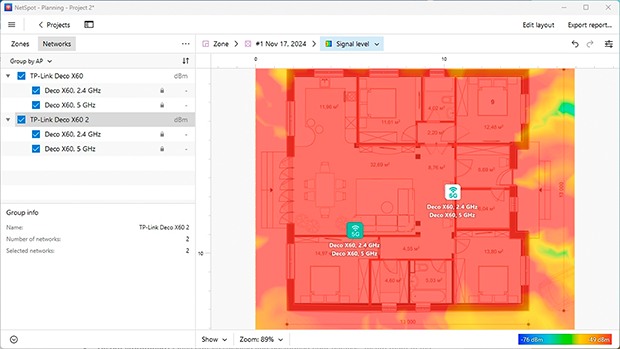
- Install equipment: Once you’ve selected and positioned your devices, install them in the chosen spots. Configure them for seamless operation to ensure consistent coverage without signal drops.
Additional Options for Larger Spaces or Multi-Story Homes:
- Wi-Fi Extenders: These boost the signal of an existing network but require manual setup and some technical skills.
- Mesh Systems: Ideal for complex layouts or multi-story homes, these systems create a seamless network with multiple nodes, ensuring stable coverage throughout the space.
- Powerline Adapters: Perfect for areas with thick walls or tricky layouts, these devices transmit internet signals through your home’s electrical wiring. They are easy to set up and provide stable connections with minimal interference.
Conclusion
Improving your Wi-Fi signal and eliminating "dead zones" has never been easier, thanks to proven methods and tools like NetSpot. By following these recommendations, you can boost your Wi-Fi signal at home, increase internet speed, and ensure stable coverage in every corner of your house or office.
Optimizing your router settings, choosing the best Wi-Fi channel, and properly placing your equipment are all key steps to improving Wi-Fi speed and connection quality. If you're facing issues like slow Wi-Fi, unstable connections, or insufficient coverage, don't wait to address them.
Use NetSpot to plan your Wi-Fi network and select the optimal equipment before making a purchase. This can help you avoid unnecessary costs and achieve maximum network efficiency. Whether you're looking to eliminate Wi-Fi dead zones or find the best Wi-Fi analyzer app, NetSpot has you covered.
