Wi-Fi Site Surveys, Analysis, Troubleshooting runs on a MacBook (macOS 11+) or any laptop (Windows 7/8/10/11) with a standard 802.11be/ax/ac/n/g/a/b wireless network adapter. Read more about the 802.11be support here.
How to Measure Your Wi-Fi Signal Strength
It’s hard to enjoy the internet without having a good WiFi signal strength. Fortunately, learning how to measure it isn’t difficult as long as you have NetSpot WiFi signal strength meter at hand to help you.
Wi-Fi signal strength is an important factor in metering reliability and speed of your wireless connection. Poor wireless network signal strength can result in a frustratingly slow and unreliable Internet connection. Of course, signal strength is only half the equation. The level of noise in relation to your WLAN signal strength (the signal-to-noise ratio) is also very important.
- What Do the Wi-Fi Signal Strength Values Mean?
- Why Does Wi-Fi Signal Strength Matters?
- How to Measure the Received Signal Strength?
- What Is the Purpose of Wi-Fi Signal Strength Software?
- Measure Your Wi-Fi Signal Strength on Mac OS X and Windows
- How to Check Wi-Fi Signal Strength on iPhone
- How to Check Wi-Fi Signal Strength on Android
- Troubleshooting Your WLAN Signal Strength
- How to Improve Wi-Fi Signal Strength?
- Conclusion
- Wi-Fi Signal Strength — FAQs
What Do the Wi-Fi Signal Strength Values Mean?
Computers and mobile devices typically indicate Wi-Fi signal strength with signal bars, with 0 to 1 bar being considered a very poor signal and 3 or more bars being considered a good signal. In reality, these signal bars are simply visual representations of something called received signal strength indicator (RSSI).
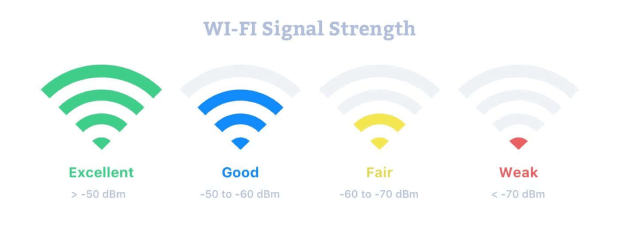
The common name for the received radio signal power level in a wireless network is RSSI (Received Signal Strength Indicator). WiFi signal strength is typically measured in decibel milliwatts (dBm), a unit of the level that is used to indicate that a power ratio is expressed in decibels (dB) with reference to one milliwatt (mW).
When interpreting this unit, it’s important to keep in mind that the decibel scale is logarithmic and not linear. As such, 3 dB increase in level doubles signal strength, while 10 dB increase in level is equivalent to a 10-fold increase in power. RSSI is a measurement of the power present in a received radio signal, and it’s indicated in decibels per milliwatt (dBm).
To better understand what this means in practice, let’s take a look at the table below, which describes various levels of signal strength loss and how they affect network performance.
| Strength | -30 dBm |
| Summary | Amazing |
| Expected quality | Minimum signal strength for applications that require very reliable, timely delivery of data packets. |
| Required for | N/A |
| Strength | -67 dBm |
| Summary | Great |
| Expected quality | The maximum signal strength that is achievable under controlled conditions. |
| Required for | Voice over IP and real-time streaming video |
| Strength | -70 dBm |
| Summary | Average |
| Expected quality | Minimum signal strength for reliable packet delivery and tasks such as email. |
| Required for | Email and light web browsing |
| Strength | -80 dBm |
| Summary | Poor |
| Expected quality | Minimum signal strength for basic connectivity, such as connecting to the network. |
| Required for | Connecting to the network |
| Strength | -90 dBm |
| Summary | Unusable |
| Expected quality | Extremely poor signal strength that makes any functionality, including connecting to the network, highly unlikely. |
| Required for | N/A |
The closer this number is to zero, the stronger the signal is. Generally, -80 dBm is considered to be the minimum signal strength for basic connectivity, while -67 dBm is good WiFi signal strength even for streaming and other demanding tasks. Signal strength between -55 dBm and -75 dBm is acceptable, depending on how close or far away from your wireless router you happen to be.
If you’re in the same room as your wireless router and have trouble achieving good network performance, the chances are that there is a lot of environmental noise from various electronic devices and other wireless networks.
You can see just how much noise there is by measuring the Signal-to-Noise ratio (SNR), which is the difference in decibels between the received signal and the background noise level. For example, if you receive a signal of -70 dBm and the noise floor is measured at – 80 dBm, the SNR is 10 dB. Of course, you want the Signal-to-Noise ratio to be as high as possible so that it’s less likely for a signal to disappear in environmental noise.
Why Does Wi-Fi Signal Strength Matters?
Today, wireless connectivity is becoming an increasingly common feature in all kinds of devices, including home appliances, wearables, and security cameras. Without a strong Wi-Fi signal, it’s impossible for wireless devices to reliably connect to the internet and transmit data. As a result, you might experience the following problems if you don’t have a good WiFi signal strength:
- Buffering during streaming of videos or music
- Slow download and upload speeds
- Dropped video calls or poor quality voice calls
- Increased latency and lag during online gaming sessions
- Smart home devices not functioning reliably
What’s more, a strong Wi-Fi signal makes it possible for connected devices to move from room to room even while streaming high-definition online video or downloading files from the internet without losing connection, which greatly improves the user experience. These and other benefits of a strong Wi-Fi signal highlight its importance and make Wi-Fi signal strength optimization a task worth pursuing.
How to Measure the Received Signal Strength?
RSSI is a measurement of the power present in a received radio signal, and it can be easily measured using a Wi-Fi signal strength app. Some Wi-Fi signal strength apps can even monitor the strength of a Wi-Fi signal in real-time and display the results for multiple networks at the same time.
In real-time, Wi-Fi signal strength can show up as numbers, graphs, or heatmaps. The numerical display lets you quickly get a sense of signal strength — the closer to zero, the stronger the signal. It’s super handy for quick checks and diagnostics because you get the exact RSSI value at any spot, making it easy to gauge connection quality without needing any extra visuals.
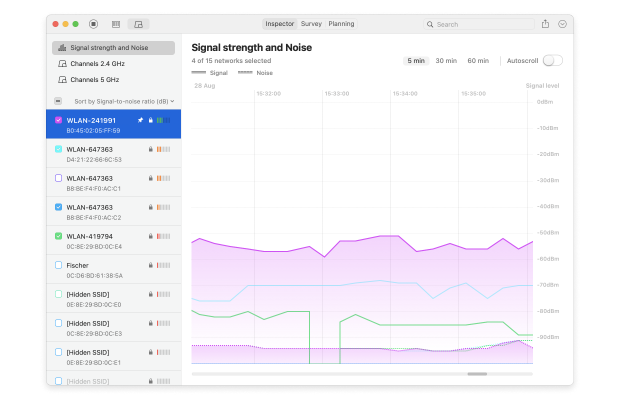
A graphical display, on the other hand, shows how signal strength changes over time, picking up fluctuations that can help spot unstable areas, temporary signal drops, or interference from other networks. The graph lets you track exactly when and by how much the signal weakens, which is great for finding the causes of a shaky connection or new sources of interference.
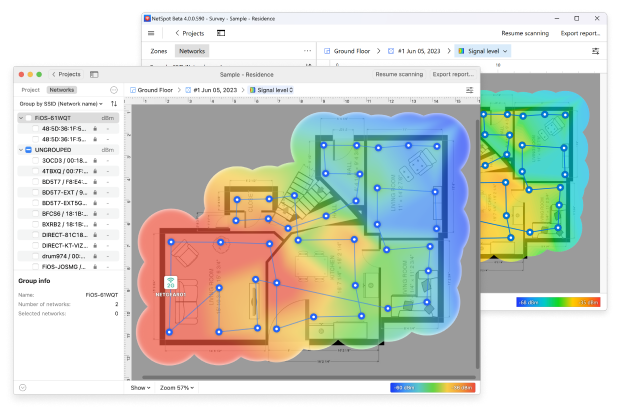
Additionally, the received signal strength can even be visualized and turned into a signal heatmap, which makes it much easier to evaluate the coverage of a Wi-Fi network and optimize its performance.
What Is the Purpose of Wi-Fi Signal Strength Software?
Knowing what the WiFi signal strength dBm values mean and understanding how they can affect your online experience is only one half of the battle. The other half is collecting and analyzing WiFi data to determine the current dBm value of your signal, and that’s where wireless signal strength software comes in.
WiFi signal strength Mac and Windows WiFi signal strength software applications can detect all available WiFi networks and instantly reveal how strong the signals emitted by them are, making it easy to find the strongest network in any location and troubleshoot connectivity issues caused by interference and other common problems.
Besides allowing you to test WiFi signal strength, WiFi signal strength software can also be used to optimize the deployment of multiple WiFi hotspots by ensuring that they together provide even coverage of the entire area where you want wireless internet to be available.
The best WiFi signal strength software can even turn the gathered data into heatmap visualizations, showing exactly where dBM values are high and where they are low, allowing even beginners with limited technical knowledge to instantly spot signal weakspots and other issues.
Do you want to know how is WiFi signal strength measured using WiFi signal strength software? Then continue reading.
Measure Your Wi-Fi Signal Strength on Mac OS X and Windows
When setting up and maintaining a wireless network, you'll want to maintain good signal strength in all areas within the network perimeter. "Dead" spots of weak signal strength can cause connections to be dropped. With more and more people moving around while connected to the Internet through their smartphone or tablet, these dead spots have become more problematic.
NetSpot is a wireless signal strength meter and WiFi site survey application. It provides three ways of measuring your WLAN signal strength.
-

Inspector Mode
Turn NetSpot into a WiFi signal strength meter that provides real-time insights into the WiFi networks around you.
-

Survey Mode
Makes it easy to create detailed WiFi strength heat maps.
-

Planning Mode
Enables you to simulate and plan your WiFi network's layout and coverage.
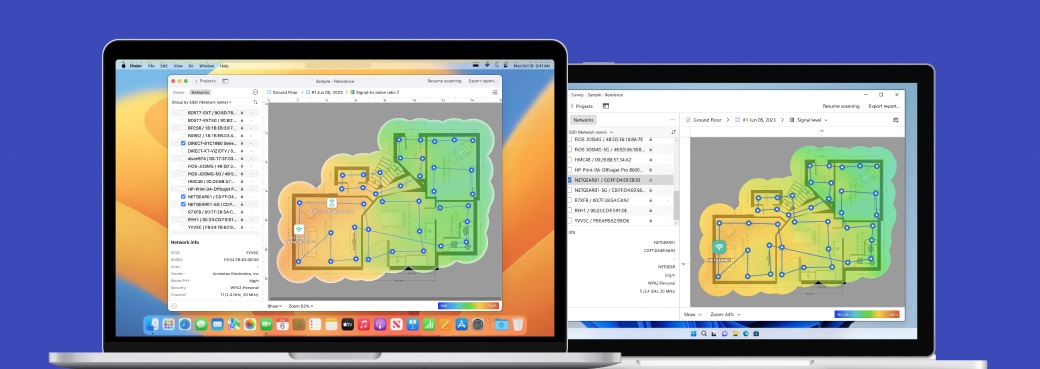
To quickly assess the signal strength of your Wi-Fi network, launch NetSpot and select Inspector mode at the top of the interface. In this mode, NetSpot automatically displays all nearby wireless networks, including hidden ones that typically don’t show up in standard scans.
These hidden networks can create interference and affect connection stability, so being aware of them helps you factor them in when optimizing your network and choosing less congested Wi-Fi channels.

NetSpot provides detailed information about each network, including signal strength, mode, channel, channel width, and more. This makes it easy to evaluate your network’s stability compared to surrounding networks. You can also access Signal Level and Noise graphs, which visualize signal quality, channel overlap, and interference sources.
Comparing your network with nearby ones helps you make effective decisions to boost signal strength and reduce interference, ensuring a more stable and reliable connection.
If you just need to measure your wireless network signal strength in one location, then Inspector Mode is all you need. However, if you wish to measure signal strength throughout your network area, you'll want to do a full site survey. This is how to check WiFi signal strength using NetSpot’s Survey Mode:
- Open NetSpot.
- Change the slider located in the top to the Survey position.
- Create a new survey.
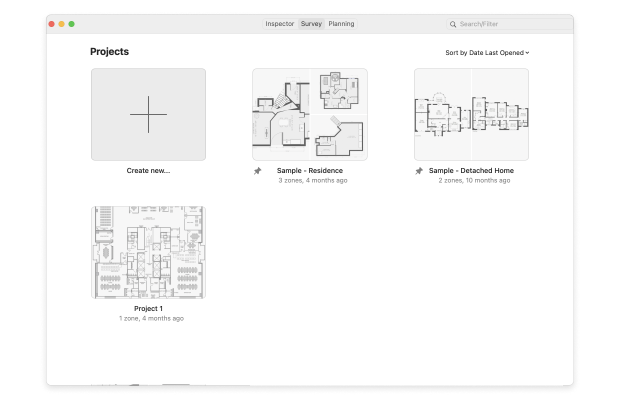
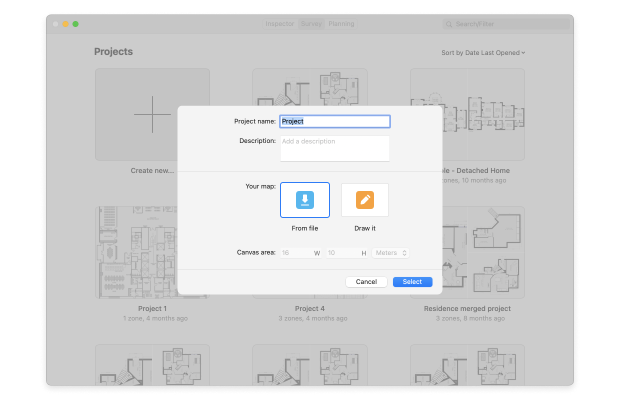
- You will be asked to either draw a map of your area using NetSpot's map drawing tool or upload an existing one.
- With the map ready, you can methodically move through the entire surveyed area until you’ve covered it all.
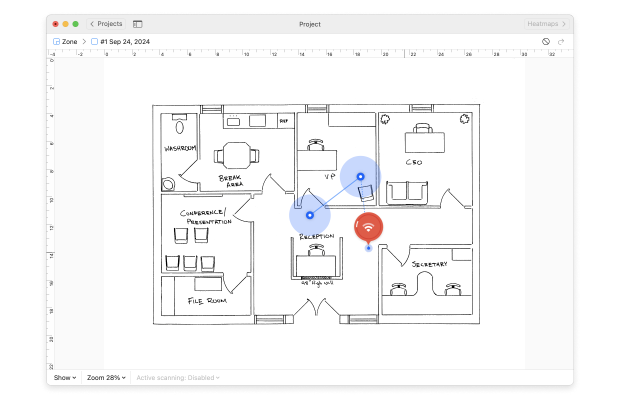
- When done, click the Heatmaps button in the upper-right corner.
Once you’re done, NetSpot will generate a detailed heatmap of your WiFi signal strength across the surveyed area, allowing you to easily identify areas with strong and weak signals. You can use this information to optimize your network by repositioning your router or adding access points in weak signal areas.
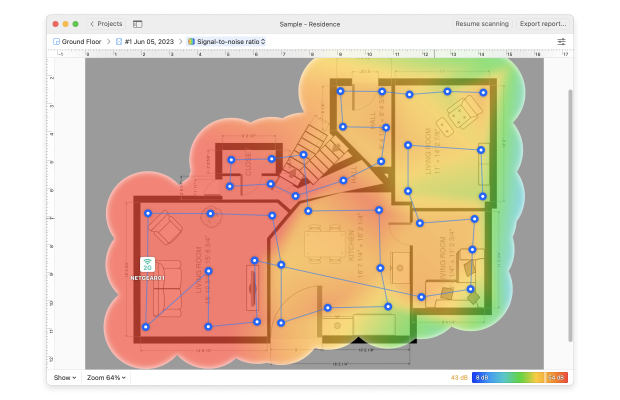
Are you planning a new WiFi deployment or would you like to expand your existing one? Then you can use Planning Mode to simulate and plan your WiFi network's layout and coverage. Here's how to use it:
- Open NetSpot.
- Change the slider located in the top to the Planning position.
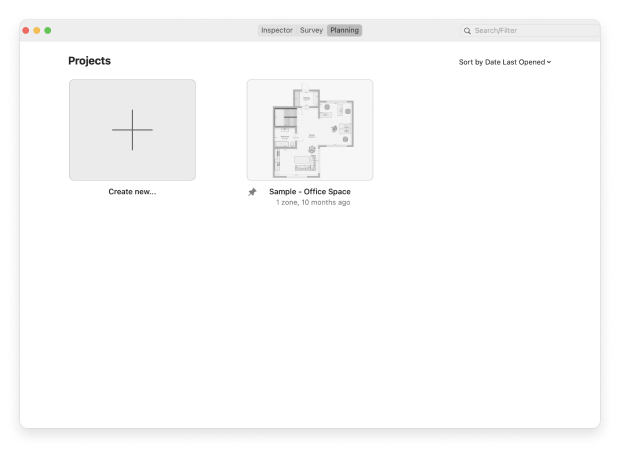
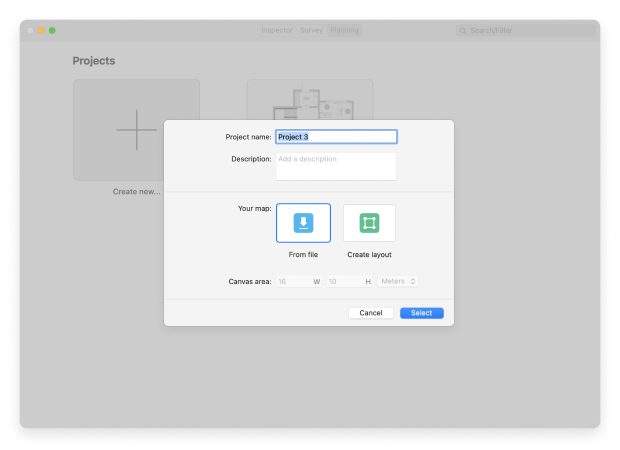
- Upload a map of your area.
- Add the number and locations of your access points.
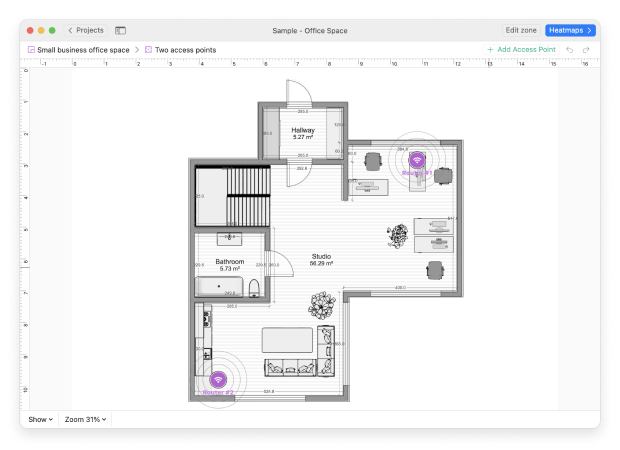
- NetSpot will simulate the coverage and signal strength of your planned network.
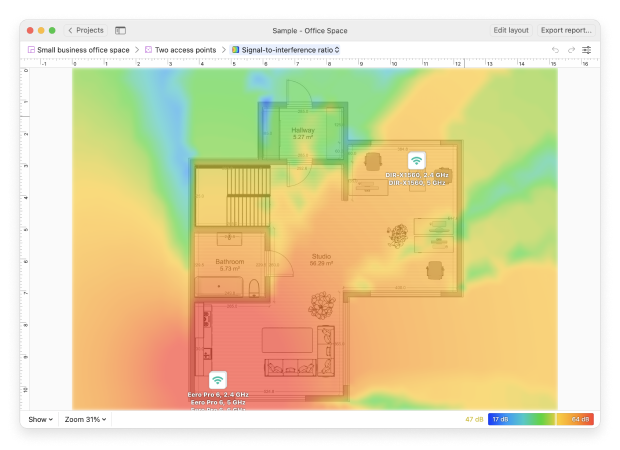
Because NetSpot mainstans an extensive database of routers, it can accurately predict how changes in your network design will impact coverage. This proactive approach helps avoid time-consuming and potentially costly trial-and-error methods, allowing you to fine-tune your network for optimal performance and reach from the start.
Apple’s macOS and Microsoft’s Windows come with built-in support for wireless network connections and corresponding utilities that allow users to connect to WiFi networks and measure WiFi signal strength. These utilities are arguably the quickest and easiest way how to measure the strength of a wireless network, but their accuracy tends to be subpar, which is why we can’t recommend them over NetSpot.
This is how to use the built-in WiFi signal strength utility on macOS:
Press Command + Shift + G to bring up the Go To Folder window.

Enter: /System/ Library/ CoreServices/ Applications.

Enter password if asked.
Double click on Wireless Diagnostics.
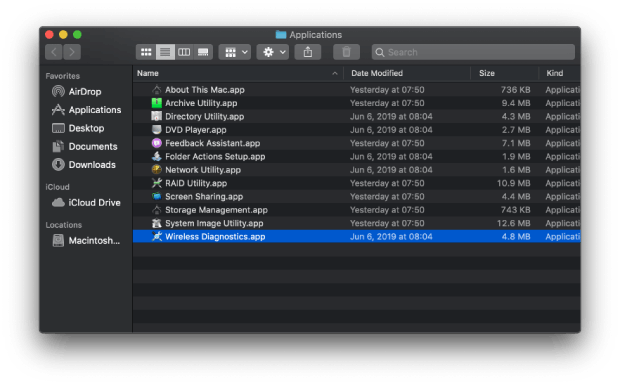
A window will appear, asking you to run a diagnostic test to determine the current state of your WiFi.
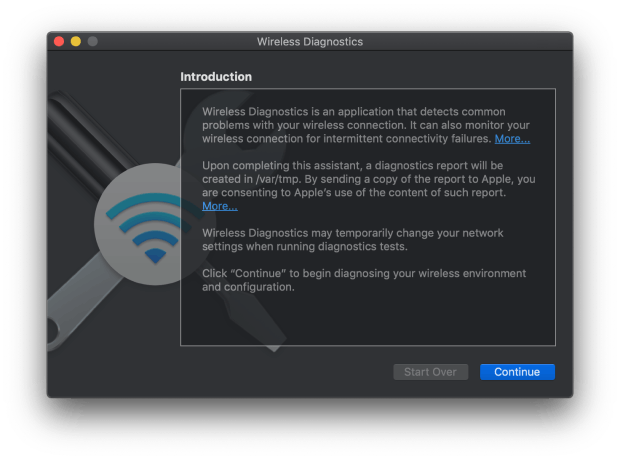
From the Wireless Diagnostics’ menu bar, select Window > Monitor.
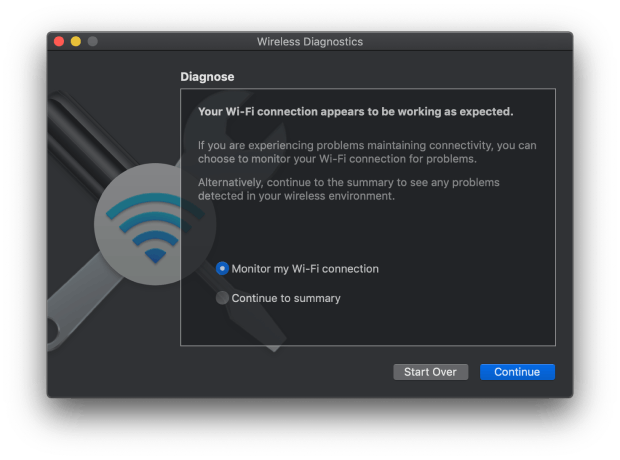
You can also try other Window options, like Scan or Performance, to see other useful diagnostic information.
This is how to check WiFi signal strength on Windows:
Open the Control Panel.
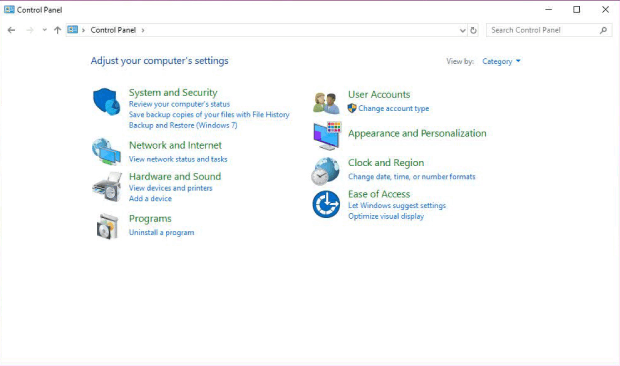
Select Network and Internet and go to Network Connections.
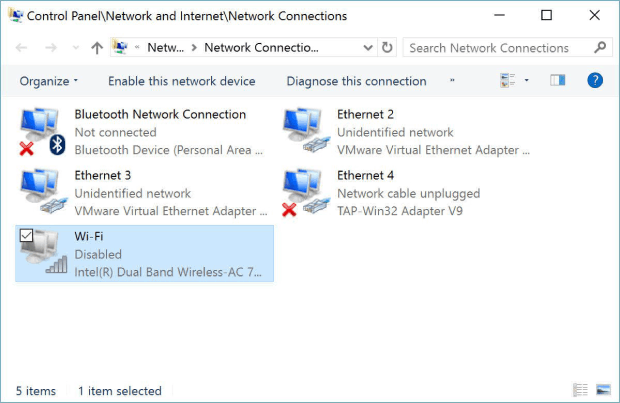
Right-click the wireless connection you want to measure and choose Connect / Disconnect to see the WiFi strength.
Of course, you can always simply click on the WiFi indicator icon located in the taskbar on Windows and macOS and count the number of solid bars.
To increase the value of their products, some manufacturers of wireless adapters provide companion software utilities to help their customers connect to WiFi networks, change important settings, and monitor wireless signal strength.
It’s possible that the companion utility was included with your wireless adapter on a CD, but it’s more likely that the manufacturer distributes it online. In any case, you need :
To install it on your Windows or Mac computer so that you can use it to check WiFi signal strength.
Next, launch the utility and look for its icon in the System Tray or the Menu Bar, depending on if you use Windows or macOS. There’s a chance that the icon itself will indicate the strength of your WiFi signal by showing a different number of bars.
If not, then click the icon to open the utility itself and look for WiFi strength information.
An online internet speed test won’t actually be able to measure your WiFi signal strength, but they can tell you the maximum download and upload speeds your internet connection can achieve. By comparing the measured speeds with the speeds declared by your internet service provider, you can get a pretty good idea about the strength of the WiFi signal in your location.
Just keep in mind that there are many other factors that can potentially influence your download and upload speeds, such as the software you run, number of users on your network, ISP network bottlenecks, and more.
To measure your download and upload speeds using an online speed test:
Go to: https://www.speedtest.net/.
Click the Go button and wait for the test to finish.
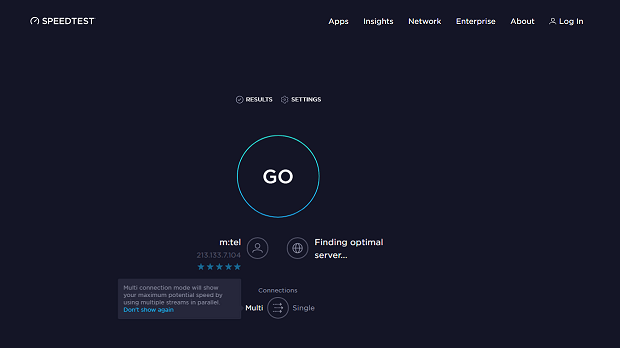
Compare the results with the download and upload speeds advertised by your internet service provider.
Speedtest by Ookla is just one of many internet speed test applications that are readily available online. Popular alternatives to Speedtest by Ookla include Fast.com, SpeedOf.Me, TestMy.net, Internet Health Test, and SpeedSmart. The main reason why Speedtest by Ookla has earned our recommendation has to do with the fact that it has servers all around the world, which ensures high accuracy of its tests.
How to Check Wi-Fi Signal Strength on iPhone
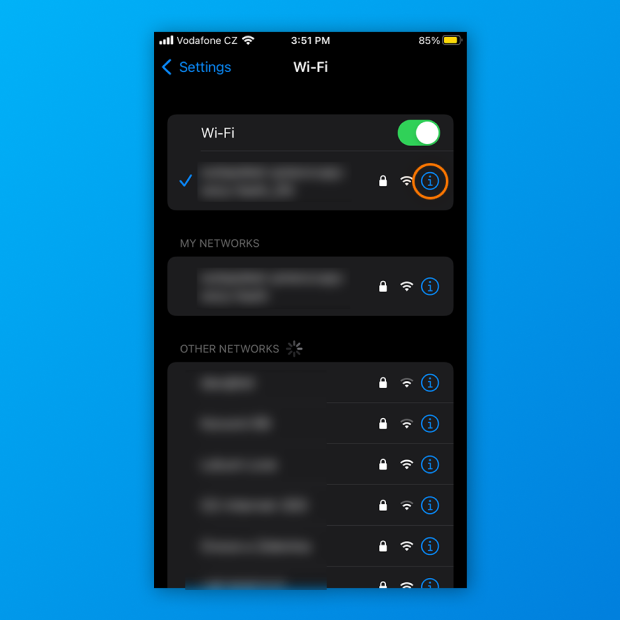
You can check the WiFi signal strength of any available network from the Settings app:
Launch the Settings app.
Go to the WiFi section.
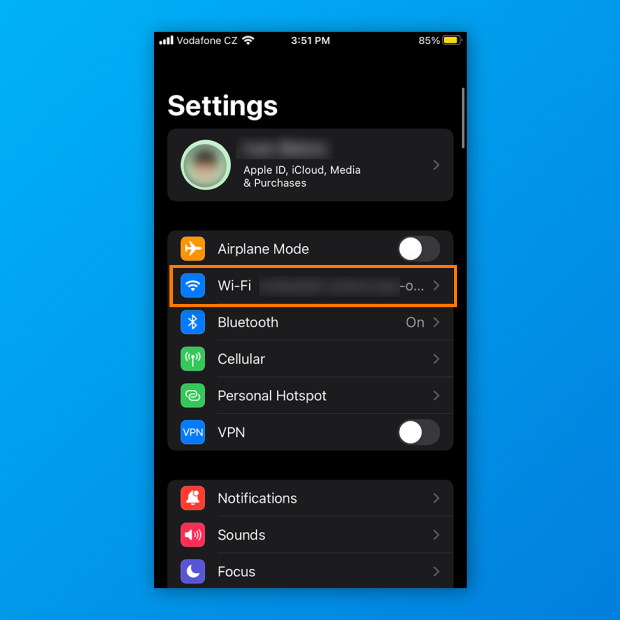
Look at the WiFi indicator icon next to the network that interests you.
How to Check Wi-Fi Signal Strength on Android
As an Android user, you can check the current WiFi signal strength with a few simple taps:
Tap the Settings app icon to launch it.

Navigate to the WiFi section.
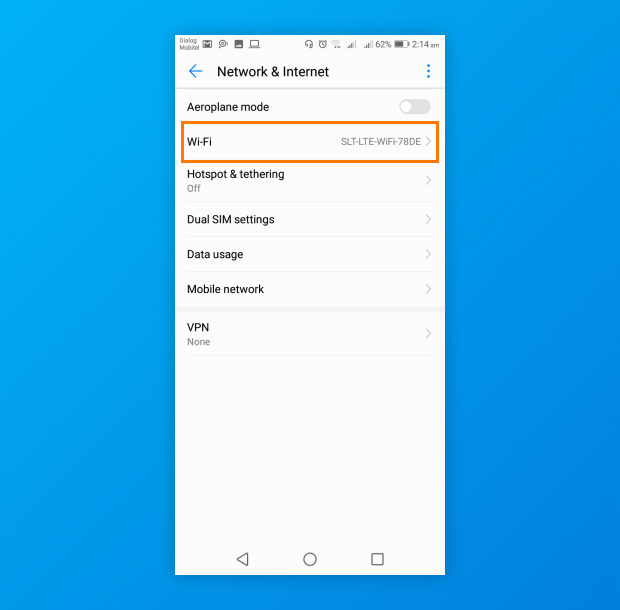
Look at the WiFi indicator icon next to the network that interests you. The number of highlighted bars corresponds to the strength of the network (more = better).
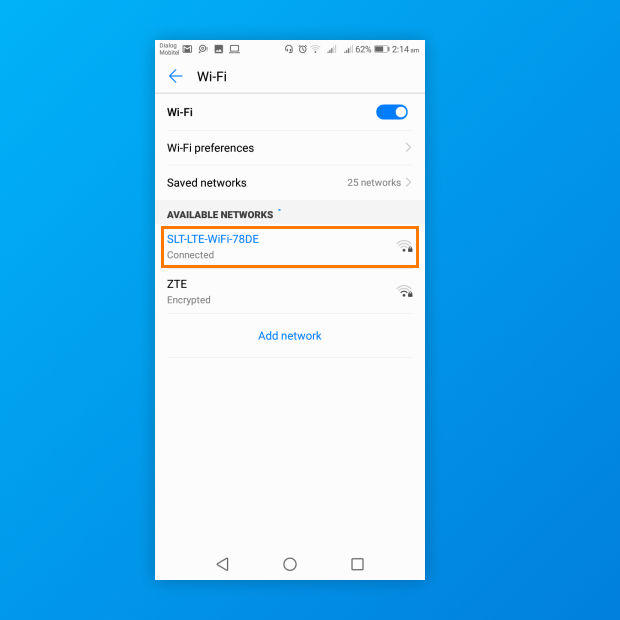
On most Android devices, you can top an available WiFi network to see more information about it, including a summary of how good its strength is.
If you’re not satisfied with the amount of information displayed by the Settings app, then you can download a third-party WiFi analyzer for Android from the Google Play Store.

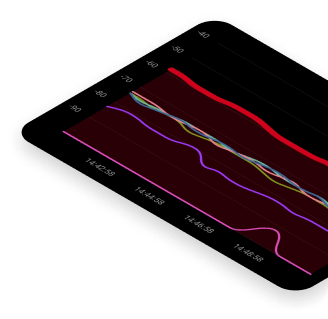
There are many great analyzers to choose from, and some of the best options don’t cost anything at all to download, including NetSpot for Android. You can scan all nearby Wi-Fi networks, collect detailed technical data like signal strength, channel usage, and security settings, and then visualize the results directly on a map for better understanding of your current coverage.
In addition to passive scanning, NetSpot includes a powerful Planning Mode — perfect if you're setting up a new network or improving an existing one. This mode allows you to simulate signal distribution, experiment with different access point placements, and even choose specific device models from a built-in list of manufacturers. That means you can test your setup virtually before buying any hardware, saving both time and money while ensuring optimal coverage.
Troubleshooting Your WLAN Signal Strength
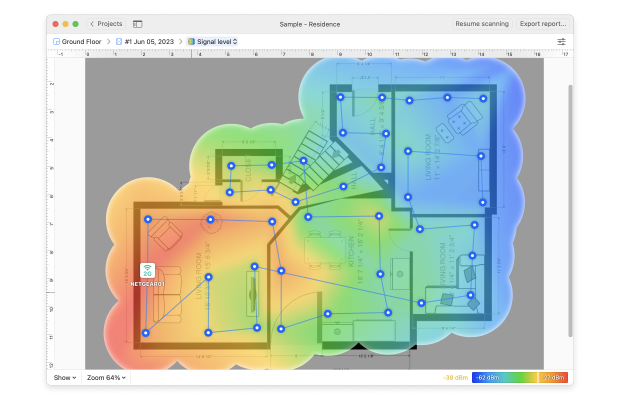
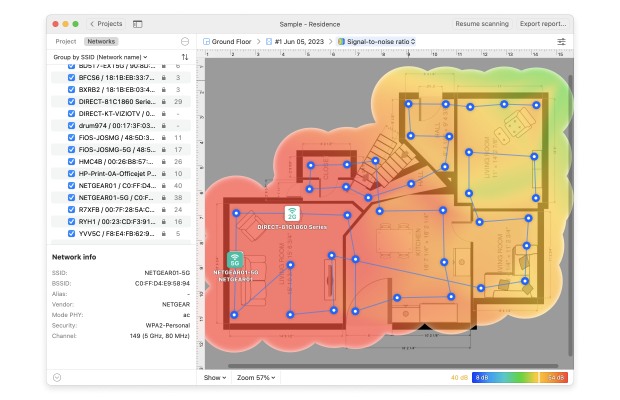
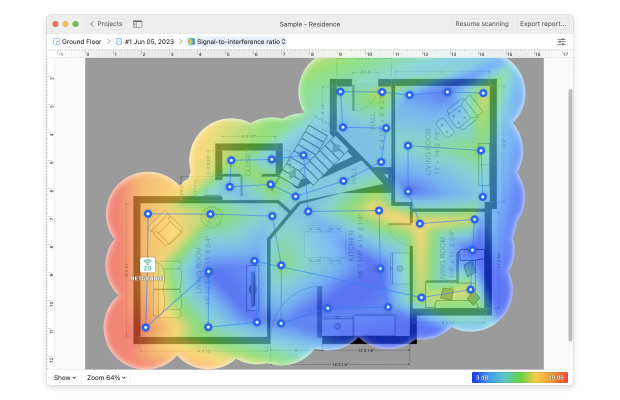
Once you have completed your survey, there are three WiFi heatmap visualizations you will want to view:
- The first is Signal Level. This will show you the WLAN signal level throughout the area you surveyed. Blue and purple areas are places where the wireless network signal is weakest.
- Then you'll want to view the Signal-to-Noise Ratio heatmap. A lot of environmental noise (from microwaves, cordless phones, fluorescent lights, etc.) can make even a decently strong signal virtually unusable.
- Third, view your Signal-to-Interference Ratio — this measures the channel interference from other wireless networks. Again, the blue and purple areas are the ones of greatest concern.
Once you've identified areas of low Wi-Fi signal strength, you can take steps to correct it. Options include: moving an access point/router, adding a new access point, or installing Wi-Fi signal repeater or a WiFi extender.
If it's a high noise level that's the problem, you can take steps to reduce the noise by moving your access point, moving or shielding the interfering device, or switching from the 2.4 GHz band to the 5 GHz or 6 GHz one. The 6 GHz band offers even more channels and less interference, so it’s a great option for devices that support it.
If the problem is high levels of interference, try changing channels to one with less interference. See these troubleshooting guides to learn more about signal level, noise level and channel interference.
How to Improve Wi-Fi Signal Strength?
Improving Wi-Fi signal strength is neither difficult nor expensive — at least it doesn’t have to be. There are many things that you can do to instantly improve the strength of your Wi-Fi signal while keeping your current router, including the following:
- Optimize the placement of your router: Most people place their Wi-Fi router right next to their modem or gateway, not realizing that the placement of a WiFi router has a significant impact on coverage. Ideally, you want to place your router right in the center of your living space so that it can cover all rooms equally well. If your living space is irregularly shaped, or if there are thick walls and other obstacles in the way, it’s best to create a signal heatmap with a Wi-Fi signal strength app and use it to discover areas of signal weakness.
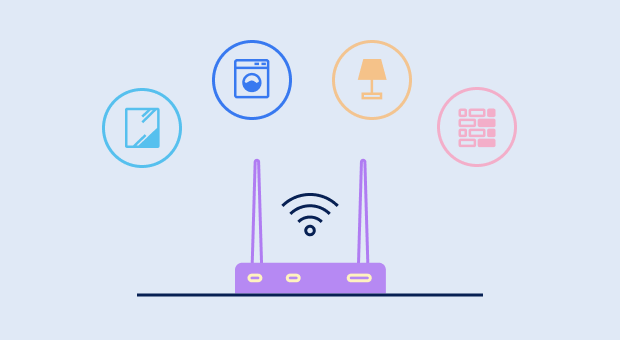
- Eliminate sources of signal interference: There are many sources of signal interference in the average home, and they include everything from large appliances to cordless phones, baby monitors, and wireless security cameras. While you probably won’t be able to eliminate all of them, you should at least ensure that your router isn’t placed directly next to them.
- Find a more suitable Wi-Fi channel: Unless you have a router capable of finding the most suitable Wi-Fi channel on its own, you need to use a Wi-Fi signal strength app to analyze the wireless activity around you and determine which Wi-Fi channels are the least busy. For best performance and coverage in the 2.4 GHz band, you should use non-overlapping channels (1, 6, and 11) since they don’t experience cross-channel interference.

- Secure your Wi-Fi network: Wi-Fi security matters — and not just because there are many malicious hackers who don’t hesitate to exploit poorly secured Wi-Fi networks for their own personal gain. Keeping Wi-Fi leeches away is another reason why you should always secure your Wi-Fi network with a strong password. When possible, use a random password that consists of letters, numbers, and special characters. Alternatively, you can use a long passphrase, which can be any nonsensical sentence.

- Update and restart your router: Routers are basically small computers that serve a very specific purpose. Just like your desktop computer or laptop, routers receive software updates that fix bugs and improve their performance. Once in a while, log in to your router’s admin interface and check if there are any updates pending installation. Even if there aren’t any, we recommend you restart your router just to give it a fresh start.
- Get a better antenna for your router: In addition to learning how to increase WiFi signal strength using the above-described method, you should check if your router has a removable antenna. If it does, then you can order a larger one online and install it just by unscrewing the original one and replacing it with the new one. WiFi antennas are fairly affordable, and the performance gains can be instantaneous.

If you’re still not satisfied with the strength of your Wi-Fi signal, you might really need to replace your Wi-Fi router with a newer, more powerful model.
A new router will also allow you to take advantage of the latest wireless technologies, such as MU-MIMO (which stands for multi-user, multiple input, multiple output) and beamforming, both of which can be real game-changers when it comes to eliminating signal weak zones and achieving consistently high data transfer speeds.
Conclusion
You can’t enjoy a smooth internet experience without a strong WiFi signal, so knowing how to measure your WiFi signal strength is something all internet users should learn. Fortunately, measuring WiFi signal strength is not difficult, especially with the help of tools like NetSpot.
By using this WiFi signal strength app, you can easily detect any performance and coverage issues with your WiFi network to enjoy web browsing, online gaming, audio and video streaming, and all other online activities without issues.
Wi-Fi Signal Strength — FAQs
There are several ways to check WiFi signal strength. If you want to obtain accurate readings without too much effort, we recommend you use a WiFi signal strength analyzer like NetSpot. If you just want to quickly see how good or bad your signal is, you can use a smartphone as a makeshift WiFi analyzer.
WiFi signal strength is indicated in decibels per milliwatt (dBm), and a signal strength higher than -70 dBm is generally considered to be good enough for most basic tasks. For bandwidth- or latency-intensive tasks such as high-definition streaming or online gaming, you should aim for at least -67 dBm.
There are two ways to check your WiFi signal strength on iPhone. You can open the Settings app and click Wi-Fi to see a list of all available WiFi networks and their signal strengths. Alternatively, you can download a WiFi analyzer app from the App Store and use it to collect more accurate data.
That depends largely on the intended usage since email and casual web browsing, for example, require far less bandwidth than, let’s say, video streaming or group video conferencing. That said, a signal strength between -55 dBm and -75 dBm is acceptable for most tasks, but it’s a good idea to stay away from the lower end of the spectrum.
The simplest way to increase your phone’s signal strength is to move closer to the router. Of course, that’s not always possible, which is where various WiFi signal strength optimization techniques come into play. They include finding a more suitable WiFi channel, taking advantage of the 5 GHz band, placing the router in the optimal location, and so on.
Your WiFi signal strength is measured in decibels per milliwatt (dBm), and it’s expressed in negative values, with -70 dBm being much worse than -60 dBm. If your WiFi signal strength is at least -70 dBm, you should be able to do all basic online tasks, such as browse the web and send emails.
To always enjoy a comfortable online experience regardless of it you’re just browsing the web or streaming high-definition video, your WiFi signal strength should be at least 100 Mbps. Of course, a much slower connection is sufficient if your needs are more modest.
A well-configured router should be able to cover an area with a diameter of 50 meters when located indoors and 100 meters when located outdoors. Keep in mind, however, that it’s much easier to cover a large area with a strong WiFi signal if you live in a rural area and don’t have many neighbors than if you live in a busy city where WiFi interference can reach extreme levels.
A signal with a power level of 19 dBm is significantly stronger than the wireless LAN transmission power in laptops (15 dBm). A signal of this strength should be able to pass through solid obstacles and still allow for satisfactory data transfer speeds.
Your phone indicates the strength of your WiFi signal by how many bars the WiFi indicator icon has. If you have full bars, then it means the WiFi signal strength is excellent. You can also measure WiFi signal strength using dedicated apps or from the WiFi settings menu.
Whenever you are setting up something new, you want to have it properly done from the beginning. Same goes to WiFi networks. "Dead" spots with weak to no signal can affect the quality of your wireless experience greatly. By measuring WiFi signal strength and achieving an optimal setup you'll eliminate many common issues arising in WiFi networks.
- Method 1. Use NetSpot to measure WiFi signal and troubleshoot issues.
- Method 2. Use a built-in WiFi Signal Strength Utility.
- Method 3. Open Your Wireless Adapter's Utility Program.
- Method 4. Use an Online Internet Speed Test.
To measure WiFi signal with the built-in utility on macOS perform the following:
- In your Finder app use Command + Shift + G keys to open the Go To Folder window.
- Type: /System/ Library/ CoreServices/ Applications.
- Enter password if asked and open the Wireless Diagnostics app.
- Run the diagnostics to determine the current state of your WiFi.
Follow these steps to measure WiFi signal strength on Windows:
- Open the Control Panel and select Network and Internet.
- Go to Network Connections.
- Right-click the wireless connection you are looking into and use the Connect / Disconnect option.
Alternatively you can use the WiFi indicator icon located in the taskbar on Windows and macOS to eyeball the strength of connection.
- Open https://www.speedtest.net/ in your web browser.
- Click "Go" and wait for the test to finish.
- See how your results correlate with the advertised download and upload speeds of your Internet service provider.
WiFi signal strength is expressed in dBm, which stands for decibels relative to a milliwatt. When reading signal strength measurements, you need to know that dBm is expressed in negatives. -30 will be a higher level of signal than -80.
Also remember that the decibel scale is logarithmic and not linear: 3 dB increase in level doubles signal strength, while 10 dB increase in level is equivalent to a 10-fold increase in power. In general if you get -70 or -65 dBm, you have a good signal.
Perform a WiFi survey and have a look at the following visualizations:
- Signal Level visualization covers the area you surveyed. Blue and purple areas are those with the weakest wireless network signal.
- The Signal-to-Noise Ratio heatmap will show you how much of environmental noise (microwave ovens, cordless phones, fluorescent lights, etc.) is affecting your signal.
- Signal-to-Interference Ratio visualization displays the interference from other wireless networks. Blue and purple areas are the ones of greatest concern.


